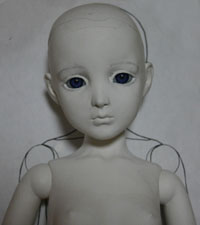
How to make ball-jointed doll making and design to create 01 images
The structure of the doll is as follows.
We support all three parts in the two sets of rubber. Basic structure is the same in any joint doll.
, The structure is more about the joints
that joint "sphere" are described in the.
The structure of the joint doll, but for now they are all right if it can somehow about image.
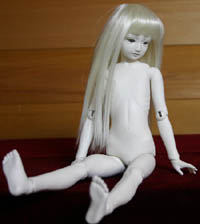
Consider the image of the doll you want to create in the next. Production will be fun and I have also good Yuku Utsuro~tsu image while playing with clay, and there is a saying I want to make this face. I will draw fastened or in a hurry to get shaky before that image, the face angle and draw the image firmly believe, that pops into your head in the foot. The courses are designed to make girls
like this and I think I try to do. Here are the steps when creating a blueprint from the image. Because I do not picture too well, when actually draw
drawing the human body ,
anatomy-friendly art , etc. Please refer to the.


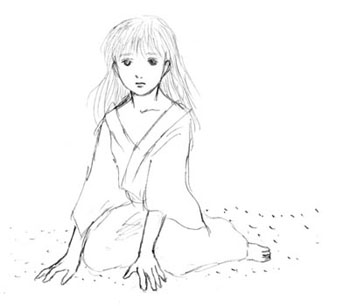 | Na so I thought I want to make Japanese-style girl like this,
and then try to draw drop. Is not a girl of course This is an example. . .
|
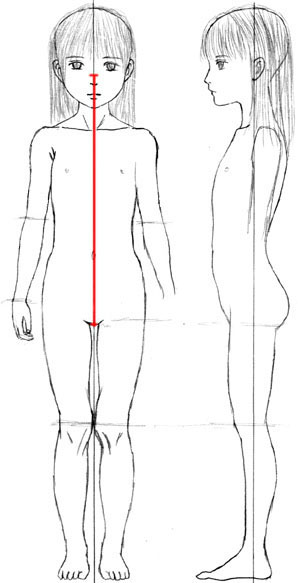
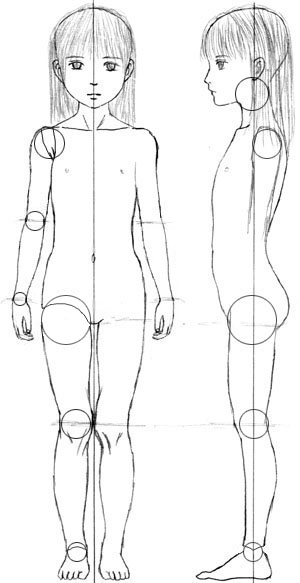
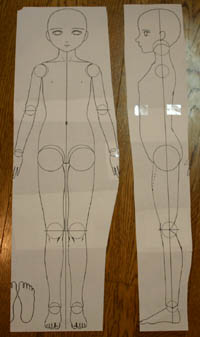
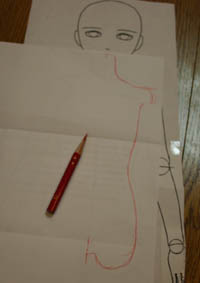
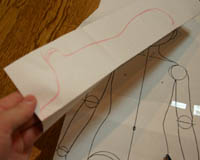
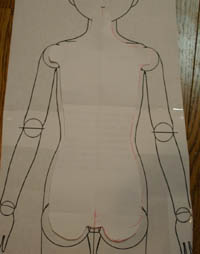
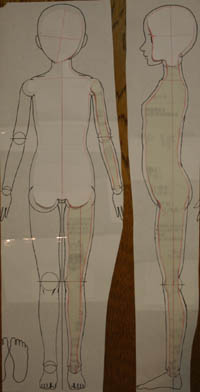
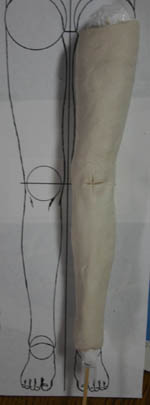
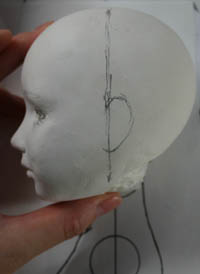
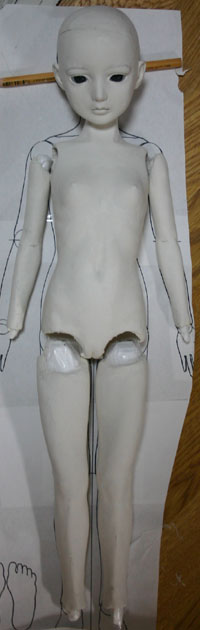
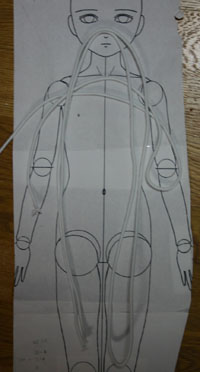
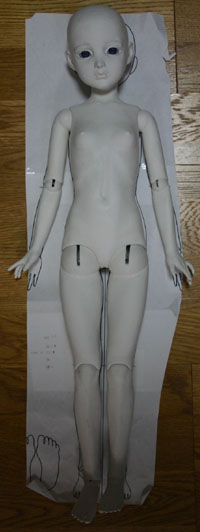
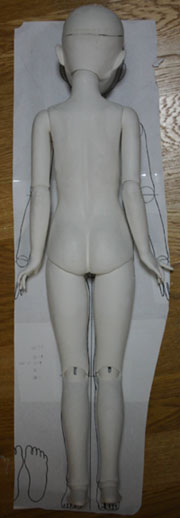
 | Based on the image, try to draw a front view and side view draw two lines in the paper book. Softening was beefy shoulder ... The sloping shoulders or to your liking. Side view so that it will draw a straight line from neck to ankle. You can then self-reliance when made. Please note that it has become bow-shaped fuselage. This is more firmly drawn that assignment, you can make even without a blueprint drawn up here. How to cause a blueprint from a front view of the degree has落描is written on the bottom.
|
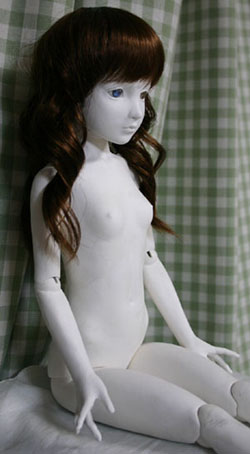
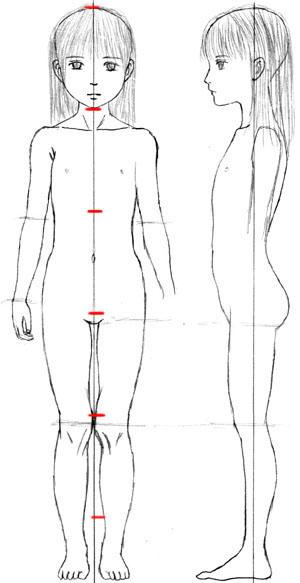 | This child is like the head and body about 5.5.
What about 10 years.
Who set up the oversized head realistic human head and body than you will see the cute. Basically, the infant is 4-5 head and body, girl, boy, head and body 5.5 to 6.5, adult head and body are made from 7 to 7.5.
|
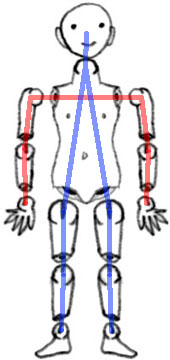
 | Shoulder width is determined from the thickness of the waist.
Will be strange and not widely than the waist.
Shoulder will appear more adult.
If the male body will be feeling further inverted triangle. |
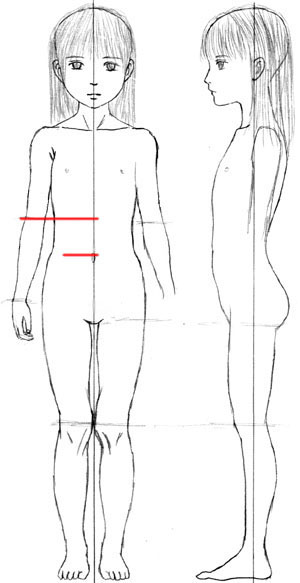 | Position of the elbow is above the navel. |
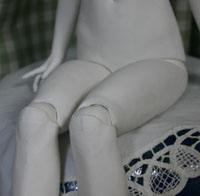
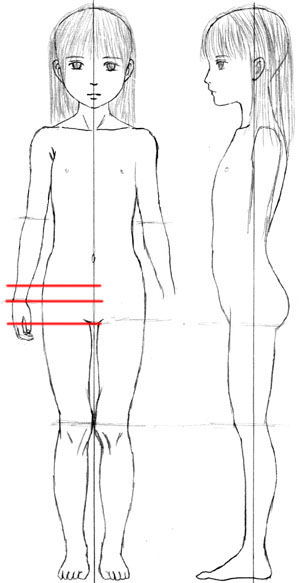 | Wrist position is from the middle of the office side of the pelvis and leg bones are out.
This child is a little short.
Doll feet long, at the bottom of the sphere will be the long line of wrist inseam.
It is also individual differences in this area, apart If you want to let a little human
I think not it be niceーcomb length. |
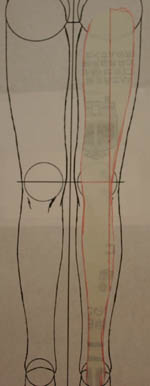
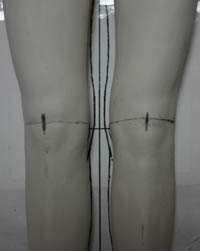
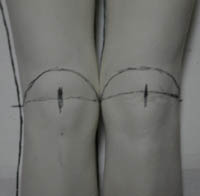
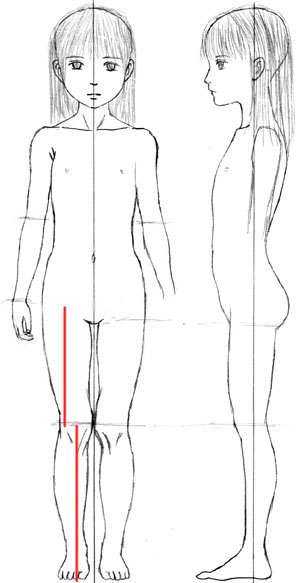 | You look down a straight line from the center of the thigh.
This line does not fit the center of the knee.
Draw to enter the inner knee.
The center of the ankle is connected by a straight line from the center of the knee. |
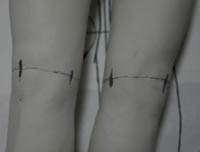
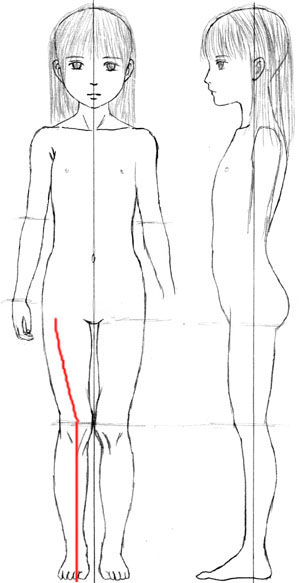 | Are drawn in the flow of short like this. When compared to the ankle from knee to knee and from the inseam, have drawn so long from the knee to the ankle a little better.
|
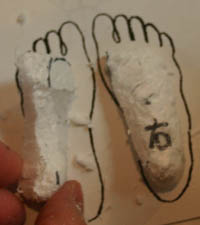
 | The length of the foot is an image of the entire left and right,
I have decided like this.
Measure the length of the heel from the first leg ... |
 | Bring it on the inseam from the line.
Came to somewhere between the eyes and nose on the line.
I think a balance or not it is more to this doll.
Not too real, I feel that a longer leg but Ppoku doll. |
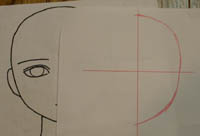
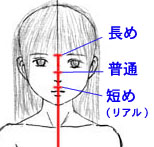 | I tried to create a diagram of the standard of length.
I will draw a different placement of the face if the other person, but as a guide only one. |
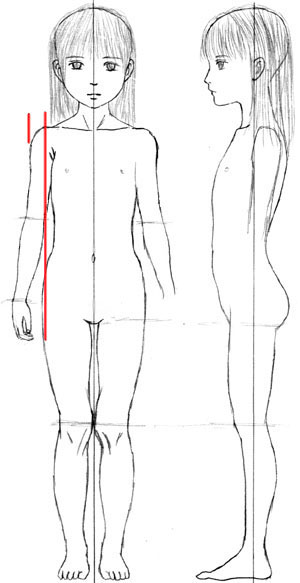
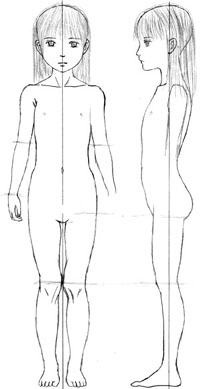 | Will look like this and actually draw on the standards.
This will be under the nose area and bring on the length of the inseam.
This is about real human beings.
I think this is good enough if a real doll. |
 | This will be around the eyebrow and bring on the length of the inseam.
Legs are longer.
Good style doll, a anime character looks like this tick. Here is just to move the leg, or actually changing the position of the knee, can become necessary to adjust or fine such as changing the length of the hand.
|
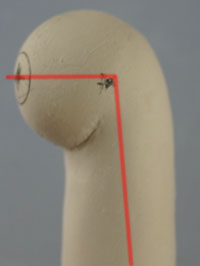
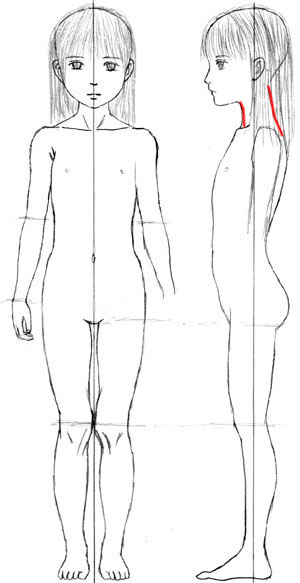 | Is a side view, depicting neck are aware that it is at an angle. |
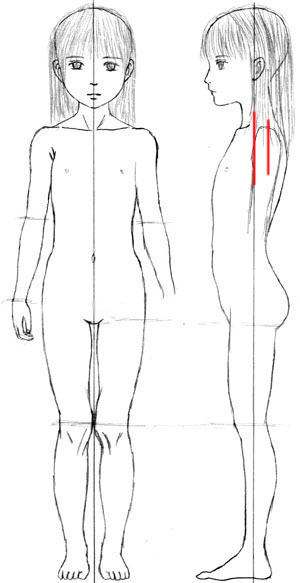 | In addition, the center line of the shoulder and the side of the center line does not fit.
Has shifted to feel drawn in a little behind. |
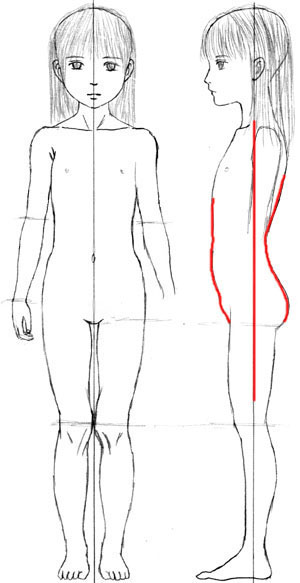 | How to feel this as the center line ...
I think the body point to draw the bow a little. |
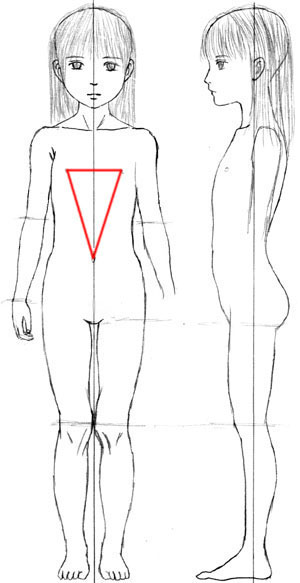 | The position of the navel, and then suitably arranged so that the isosceles triangle.
Will feel strange or too much on. |
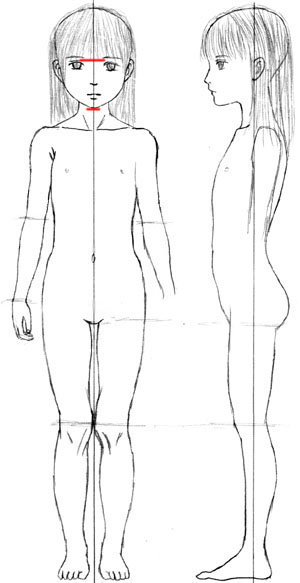 | The size of the hand, we have about the size of the chin on top of the eye.
Leg + toes will be this length.
It also varies based on age. |
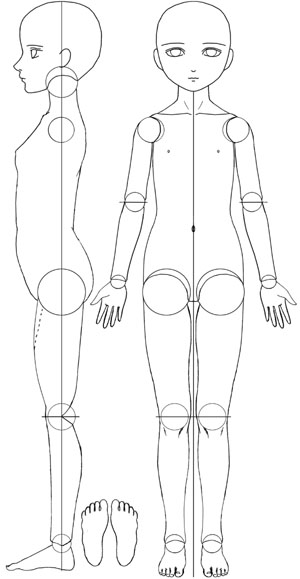
 | Turning the ball. (Front view will place the ball to the actual symmetry is inverted)
to set the size is too careful not to extend beyond the line of the body.
The fewer parts are in contact with the sphere is received,
the conscious of the fact that a wide range of movement.
Such as the femur will not sit down, have too much into that sphere, for example.
Can not or outward or inward to enter spheres shoulder too. Joints of the neck, try to draw into the front first, and then about a little larger than the thickness of the neck. Bring it to the side, add up if someone is OK. If you are supposed to be a small ball from Oita neck when brought to the side, then either fix the line of the neck to fit the ball in the side view, should not be more thick and not the neck of the front view. The size of the sphere of the knee is where the most trouble. It is difficult to make thinner side of the knee is too too large, it becomes a thick unnatural side of the knee is too small, I can not get even more range of movement. Since this side and I think depending on the How to cut the knee joint, please try to make various. Is the diameter of the sphere of each part, if the ball of my knee = ball of the shoulder, has become a sphere of about ≒ sphere of elbow ankle. In side view, the center of the sphere of spheres of knee ankle → → → sphere of the femoral neck also ball and place to be in a straight line. Fixed so that the height of the ball in front view, side view to putting the ball is easy.
|
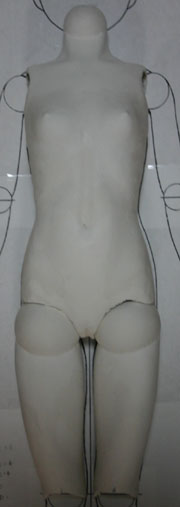
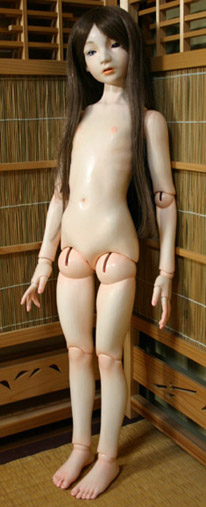 | Bonus. Japanese girl is a doll I made.
7 head and body weakness. Is the length of the inseam between the eyes and nose around in the How to measure the case.
Has a longer arm on the grounds that intentionally so noticeable that the longer arm of the kimono sleeve.
What was speculation as I do not know well. . . |
How to make on a PC, do the following in the multiplication layer of Fotosho.
• If you only draw a front view you stuck to reverse trace the one side of the front view on a PC was able to capture a picture. Try printing When you are a front view anyway. Please adjust the print position to come in half lengthwise of A4. To draw on graph paper of A4 that watermark copy it, and cause to draw a side view looking at the figure next to the front. Together with the front view and scan it again, put in Fotosho processing, such as a sphere.
• If you draw a front view and side view of the case as you stuck to reverse trace the one side of the front view on a PC was able to capture a picture. Then, put in Fotosho processing, such as a sphere. Next, place the ball at the same height as the front view side view also. Because there also be out in front and side add up, you put off or on a PC or modified. Print to any size of those Then you can. (If there is not enough space to copy the printed after expanding to print as large as possible) how to actually draw rather than a PC, look at the human body such as a book of drawings, you depict to scale directly to the graph paper. Even if it is not to scale, drawn to about A4, May I greatly enlarged copy × copy expansion. (Recommended so easy to draw better over there) a blueprint for making dolls in the course looks like this. Has an image of a figure like a Super Dollfie. Dolphy has drawn in like that, so like in the center line is almost the shoulder. Large size
of the blueprint page located in the. Blueprint, but also to subtle changes in the stage or are making, this is the basic.
How to make ball-jointed doll
cut the 02-styrene
Next, cut the foam core become.
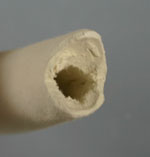
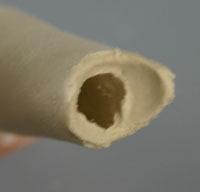
The doll, and ensure the cavity through the rubber, making it hollow in the sense of weight reduction.
The modeling work is required to wrap the clay core, the core that later withdrawn. Since the core is the basis of the foundation, after people have trouble not properly made. Such as the distortion of a little will come out from the stage of core Savory.
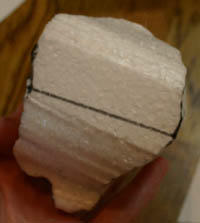
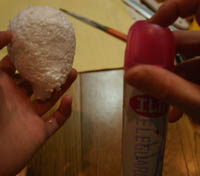
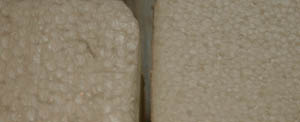
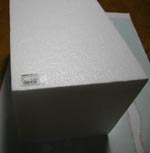 | Polystyrene foam core is great to use.
They were selling at Tokyu Hands. High ~Tsu! Is $ 1,502 a 25cm × 25cm × 40cm. You can also use it with an adhesive stuck to other thin styrene to styrene plate. This is useful after you make a styrofoam and came into the packing.

|
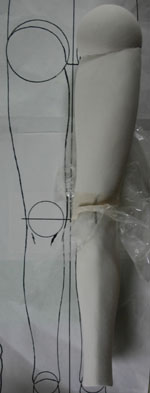
 | Prepare a drawing.
This page of the blueprint is then up to a certain girl.
To print to fit A4 what is up, then was expanded to 189% copy. (60cm height approximately)
portion of the feet and hands are summarized on a separate sheet of paper. |
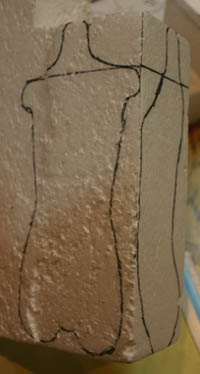
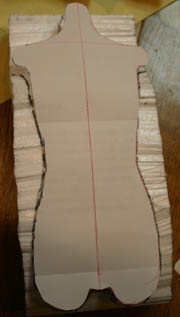
 | Determine the size of the core from the drawing, cut out. I do not need paper or tracing paper (in the photo behind the ad) to prepare, to draw the line takes about 5 mm from the inner contour of the drawing. This margin will be the thickness of the clay. Executive body is so symmetrical, only half of the copy.
|
 | You have copied the mark from the center line just at the half.
Fold in half from there. |
 | Remain folded in half and cut. Will be symmetrical when they are opened in this. |
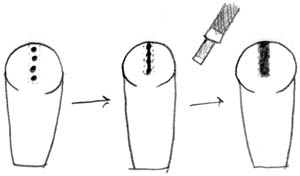
 | I've lost my inner pattern is symmetrical about 5 mm from the contour.
Please cut out the joints are extra.
This extra part is drilling holes into the joints later.
You could have one like this at the stage of core, eliminating the hassle drilling holes later. After, you have caught a horizontal line connecting the ball on the left and right shoulder joint. Also torso sideways, you have caught as a mark a horizontal line of the same height.
|
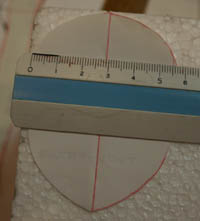
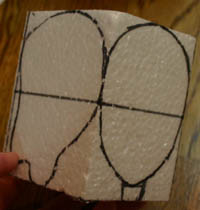
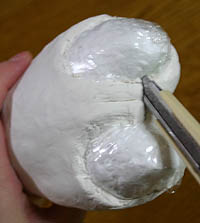
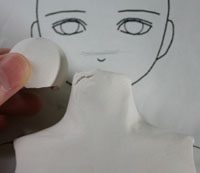
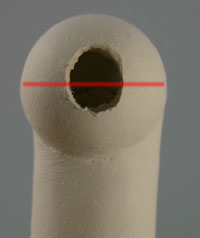
 | Create a face pattern as well.
We caught a horizontal line connecting the top of the eye. |
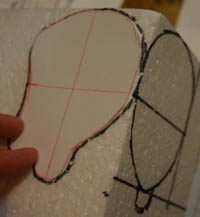
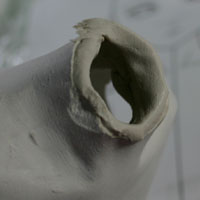
 | Will also create a profile pattern.
Profile, so do not come out and have a molding foam within the face,
make a little Egu~tsu in the form of the front.
You have caught a horizontal line above the eye even at the height of the pattern of the profile. |
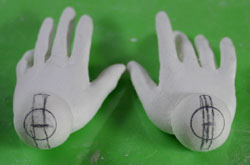
 | Pattern of arm is this has happened.
Make copy the line of the elbow. |
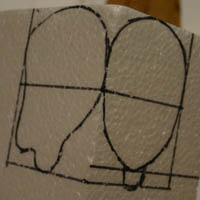
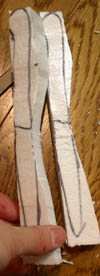
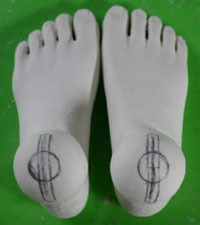
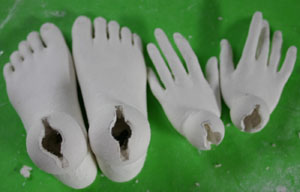
 | Pattern of the foot is this has happened.
Make a vertical line parallel to the horizontal line of the knee, and the center line of the fuselage. |
 | Where the pattern have been gathered.
Pattern of the arms and legs, one need only flip it over so you can use the left and right. |
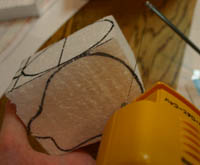
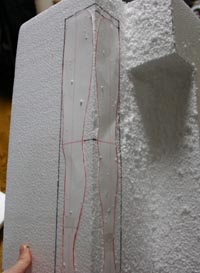
 | Place the Styrofoam the pattern.
At this time, to be parallel to the sides of the Styrofoam guidelines drawn vertically,
and then paste with a ruler scale.
The guidelines also to be parallel to the horizontal. |
 | To fit the height of the front and side of pattern,
both to align the height of the horizontal line of the same height as put by pulling. |
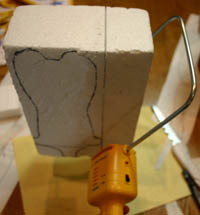
 | Along the guidelines, draw a line according to the maximum cut. |
 | Began.
Turn over the paper pattern on the side, you have copied the contour to the opposite side. |
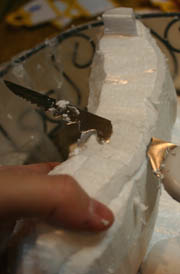
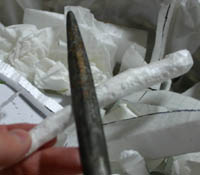
 | The electricity cut out from the side polystyrene cutter.
From both sides while mindful finely, and cut parallel to the contour of the side. |
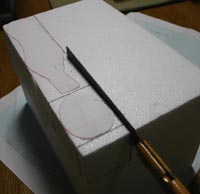
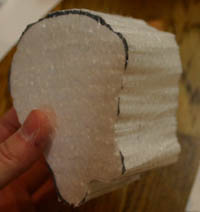 | Was cut. |
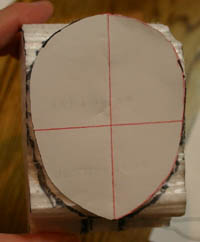 | Once cut, you copy the pattern on the front.
Good luck you copy is not level so difficult to copy.
The same copy as the front and back. |
 | Cut out taking care so that is parallel to the front and back in the same way as when the sides. |
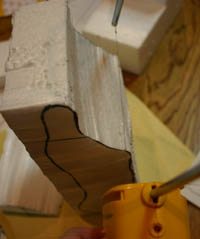
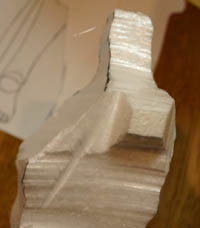
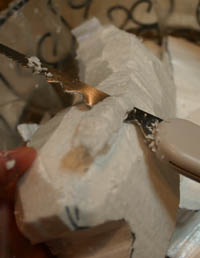
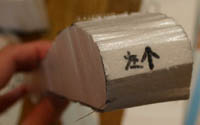
 | Next, cut off in the styrene cutter angular part. |
 | Was cut off briefly. |
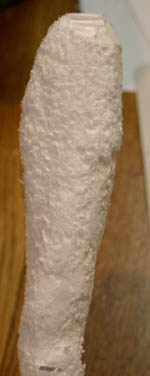
 | Part finer sand will cut at. will cut at.
Impossible so much garbage fly, let's cut on the trash.
The cut be careful not to leave the angular feel. |
 | After shaving, anti-static spray and sprayed. and sprayed.
It is easy to clean up debris scattered patches of styrene and then. |
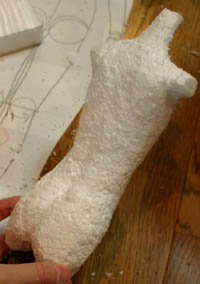
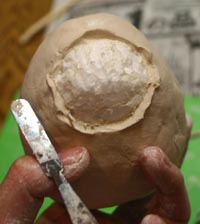
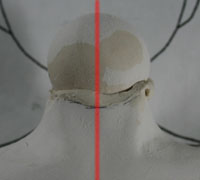
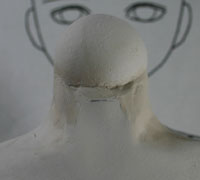
 | Sharpened core of face. |
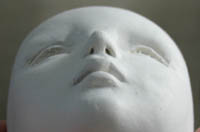
 | Seen from below.
Make sure that at this stage, the face and back of the head is turned left and right symmetry. |
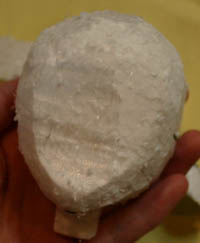
 | The fuselage was cut out as well. |
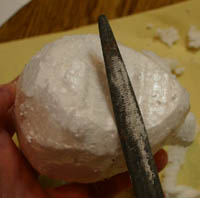
 | Turn off the electricity by using a polystyrene cutter.
Once I caught the line and cut with a slope as shown in the picture a little. |
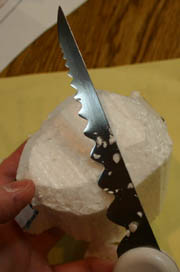
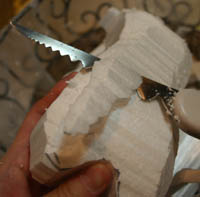
 | You can also clean a large part cut with a saw as shown in the photograph. |
 | In the same way as when I made the core of the face, we will cut out from the side. |
 | Once cut, you copy the outline of the front. |
 | When I cut the front part of the shoulder but will remain this way. |
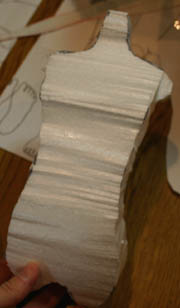 | Was cut. |
 | Drops in square polystyrene cutter. |
 | Then, you drop the angle more toward the center line of the fuselage. |
 | Aspects, drop the corner toward the center line of the side. |
 | Was able to drop a new angle.
You all have rounded corners in this manner. |
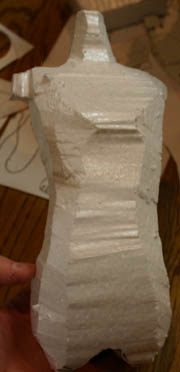
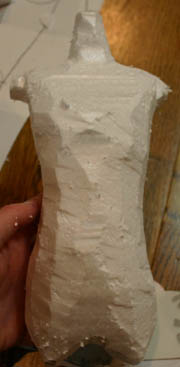 | I dropped all corners. |
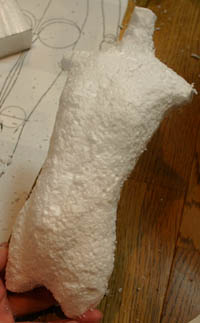 | You can then prepare sharpened by filing. |
 | Back. |
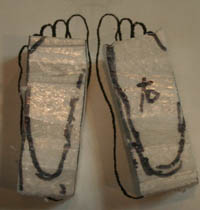
 | You also cut out parts of the foot.
You take care that fit the guidelines of the horizontal and vertical lines.
Styrofoam will be wasted and not exactly cut out. |
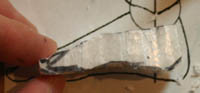
 | Where electricity is cut out with polystyrene cutter side only, and copy the outline of the front. |
 | At this stage, I write is either before or, as can be seen right or left.
Then, you also cut out front as you normally would. |
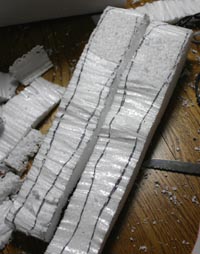
 | Thigh was shaved.
You cut to the inside a little dented. |
 | Also below the knee, you have consciously cut the shape of the muscle of the foot.
(Go into the inside as below) the center line will be in the mountains.
You cut it in the file aware. |
 | Will also create the core of the arm on a piece of styrene cut out. |
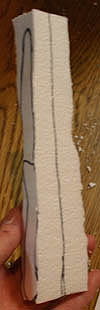 | She sees the outline, cut in half. |
 | Once cut, you also copy the outline to the other. |
 | You cut so that the shape of the arm.
Stacked with drafting arm, while you adjust the uneven cut. |
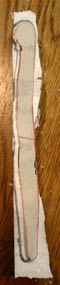
 | The following is a leg. Make cut into suitable pieces of styrene as well. |
 | You also cut to fit the sides. |
 | The shaping sharpened by filing.
You have also cut down the arch.
Make as small round than the feet of drafting. |
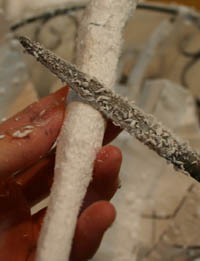
 | Part of the ankle are easily broken, you have pierced, such as bamboo skewer. |
 | Make sure when pierced bamboo skewer, or have become bent ankle.
Once bent, then unplug and re-pierced once. |
 | The details of the tip of the arm is hard to stab a bamboo skewer, and then wrapped in cellophane tape reinforced. |
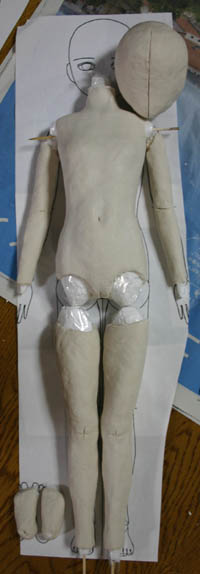
 | Place all fully equipped.
At this stage, the part they've been cut out from the drawing is.
Make sure that it was reduced to 5 mm from the contour. |
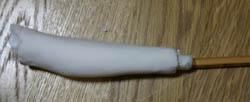
 | If the extra-small doll of a small doll case, use the straw to the core.(Photo 30 centimeter doll) was made through a straw straight arms. The right is the core was removed. Since the modeling of such painful thigh and the ball stuck to it 's eat straw hole clay I am using in conjunction with the straw to turn off the foam. Ran a core part without cut in half. Innovation comes out so vine straw. This seems to be likely to be put straw strength and leave it, so they came out really smooth sliding leave can not be put ...
|
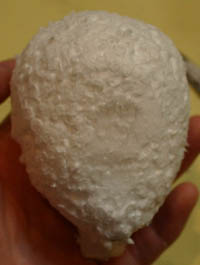
 | Further bonus-type Styrofoam to Styrofoam has others do not have a full eye. What is left rough, right eye is jammed. Rough uses large parts, the parts such as arms and legs become thinner and I want to use the eyes are filled with polystyrene foam.
|
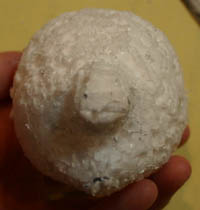
 | ☆ re-use of Styrofoam Styrofoam I think if you want to reuse the previously used, and you see a lot of funny Toko figurative. In that case, you repair by using a lighter paper clay are sold at 100 yen shops. The left is the core of the fuselage was repaired with a light paper clay. Put is useful because it made from styrene remains. Will be cumbersome and worse the balance of the core and repaired with clay or heavy clay ordinary oil.
|
 | From the side. Paper or clay, but hard to stick to light, you will somehow once dry.
|
How to make ball-jointed doll rough modeling clay to the core 03, and the molar
next work is to put the clay core.
Wrapped around the clay of thickness equal to the core, to ensure the minimum thickness.
 | This time the clay Mirador use. use.
Be sure to Yuzawaya is sold.
Clay is very easy to use less shrinkage.
You can use from beginner to advanced.
Price is like 472 yen, or you can bulk buying is cheaper or Yuzawaya membership discount.
Toko is often like they sell at about 350 yen about. I do a little at a discount 300 yen Yuzawaya?
Clay of the tree is not recommended for beginners. How good is you're using the clay of the tree indeed,
considering and that the shrinkage factor, that it is harder than Mirador when cut with a sword sculpture,
challenged the clay of the tree after they are familiar with the modeling I think it is better. |
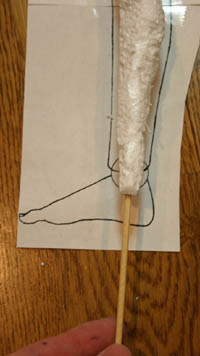
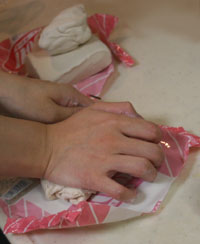
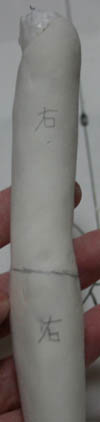
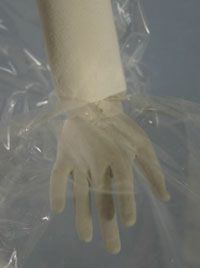
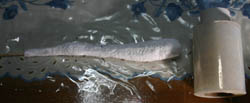 | First, we will wrap wound around a core made.
By winding the wrap, core is easier to disconnect later.
The photograph is of elongated wrap for business use. Place the core of the leg was extended.
Does not matter here in the lap of a normal course. |
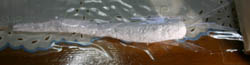 | Wrap the core of the foot.
It is a little confusing picture ... |
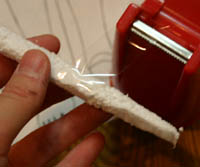
 | If you did not wrap around, you should leave a gap filled with cellophane tape. |
 | Where the baggy twist will cause adhesion.
Stuck right to the core will paste a cellophane tape.
Wrap the wrap in the same way to the core of the arm. |
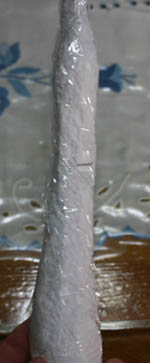
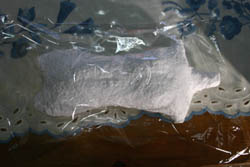 | The fuselage uses a big wrap.
Was covered with a wrap to the fuselage. |
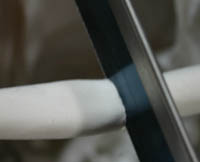
 | Cellophane tape in the back, then stop.
Deep in the dent is put the cut with a cutter,
and then remove the wrap by the length of the recess.
And re-adhered with cellophane tape as one by one along the dent and then tuck down.
Then, the shape of the core is elaborated Ikase firm. The photo is by pinching the lap where lift was incised.
|
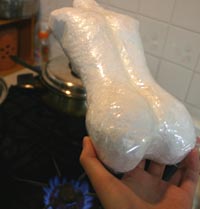 | You can then lightly seared on the stove.
Melt away and do not do quite so, please do be careful while looking at the situation.
Wrap will stick exactly to the shape of the fuselage in the clear.
The lightly seared in the same way also the other parts. |
 | I was able to paste this as a perfect lap. |
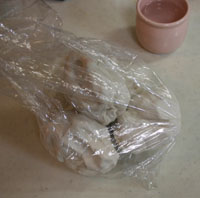
 | I owning all.
Small parts because they can affect a molding that rolled out to the wrap,
thank you also do not wound. |
 | Next, you use to prepare for the clay. El Mirador is out of the bag, knead well before use. Clay is kneaded well before use and keep, I will be strong when dry, is easy to molding. Also not tightly coupled with mumbling and use without feeling conceived, will be fragile. When the clay has hardened, you knead a little water added. Buy fresh clay is soft, will be hard even if you do not have opened six months and left alone. Small human hands, divide in half a bag Mirador, is just good in half and knead it again. Confident people, but to force it may be kneaded a bag at once, and tired ...
|
 | This is two minutes Mirador bag.
I will knead 1-2 bags at once, and set it aside to double plastic bag.
While working, to have on hand and set it aside a pouch that contains the Mirador half minutes.
Keep a bag and a lot on hand, to open and close because there are a lot of work in progress and
will go dry from the outside even though the bag.
I have on hand and the Big Bag pouch is a good idea aside. |
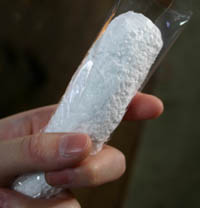
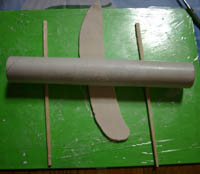
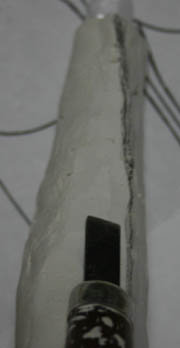
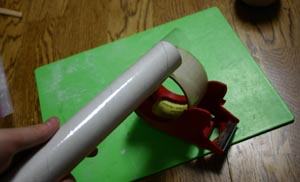 | To extend the clay flat, prepare the death of the clay bar.
Transparent adhesive tape is wound around a core of plastic wrap for packing in,
I made a rolling pin. |
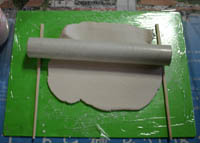 | Extend an appropriate amount of El Mirador.
Put the chopsticks on both sides, will be a uniform thickness and easily extend it to the guide. |
 | Apply a water surface. |
 | We will wrap to the core.
Compensate for the clay to cover the whole while some places do not have enough of the same thickness.
Part of the dent will make sure that you leave at this point. |
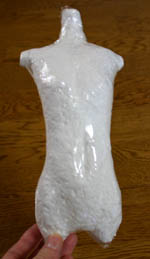
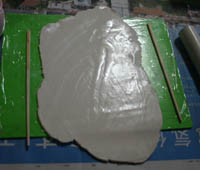
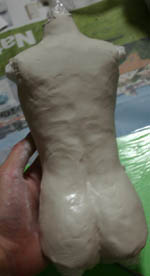
 | Was all covered.
Because the core crafted in fine form will appear in its own way just covered with clay. |
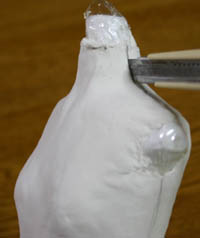
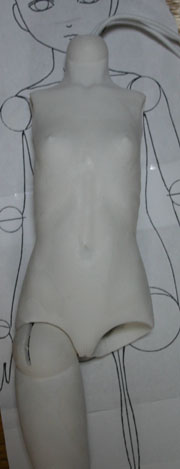
 | You have recessed the position of the navel in accordance with the drawings. |
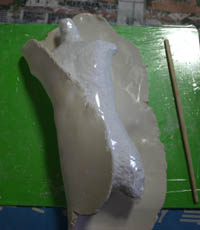
 | At this time, there is a navel in the center properly, you have to check the mirror.
Make sure that it is also symmetrical clay cover to the fuselage. |
 | Cut the extra part to fit the drawing. |
 | Was cut. The photograph is part become hip.
Similarly, you have also cut the clay to fit the shoulder joint drafting. |
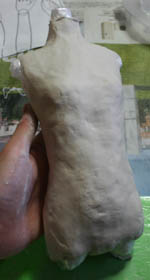
 | Leave the molding body loosely. |
 |
Shoulder blades and buttocks is a good place to make here somehow.
Once you have confirmed that the mirror becomes symmetric again, later, should the need arise. |
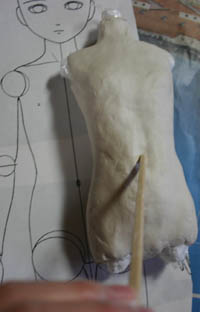
 |
After this, you have to shoulder stabbing a bamboo skewer.
Will hang in place when dry. |
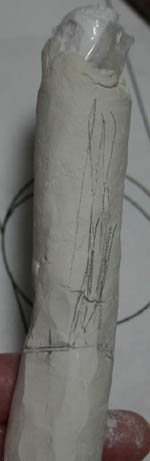
 | Then create a clay wrapped around the arm.
Clay to make a rod-shaped, elongated in the rolling pin extends. |
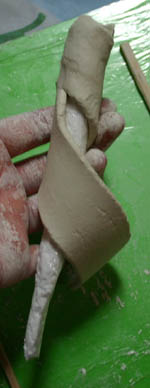 | We will wrap diagonally to the core of the arm.
And wound at an angle, you can clean wind corresponds well to the shape of the arm. |
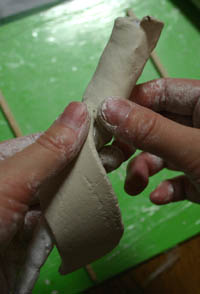 | Will flatten the seams with your fingers while wrapping.
This may seem difficult at first glance, you can do If you look surprisingly easy.
I may be flat when wrapped extended clay seemed impossible,
it may be very difficult to make so contrary to baggy. |
 | Make sure that the drawing match the thickness.
Place by pulling the line of the elbow joint with a spatula. |
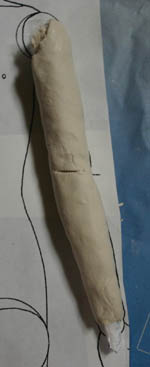
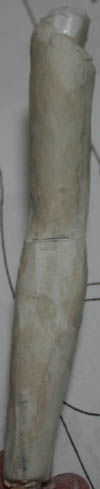
 | We will wrap in the same way to the feet. |
 | It has become more left over is full of clay and ankle, while frequently cut with scissors
will wrap. We will break to clean after you turn off. |
 | You can try to match the drawing, or has been scheduled on the thickness of the front and side.
If you do not too thick, is fine as is.
Is it okay not thicker shirttail force at this stage, a thin little thing.
Position and the knee joint, you have minus the center line.
In the photo are visible portion of the knee as +. If you are familiar with, it can be finely and then modeling here.
|
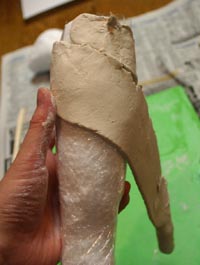
 | Wrap the core of the head also. |
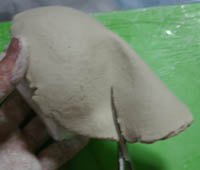 | The excess clay is cut with scissors to adjust. |
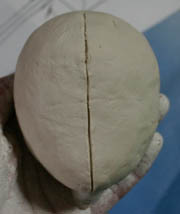 | After covering the core of your head, you have minus the center line of the face with a spatula. |
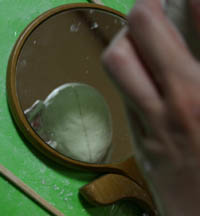 | Make sure that the center exactly comparable to the mirror. |
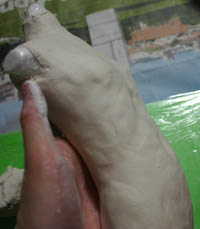
 | Wrap the core of the feet also. |
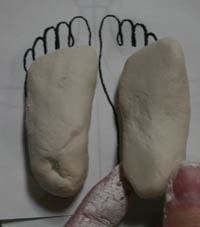 | Make sure that the drawing match with the size of the foot.
You have also made the arch. |
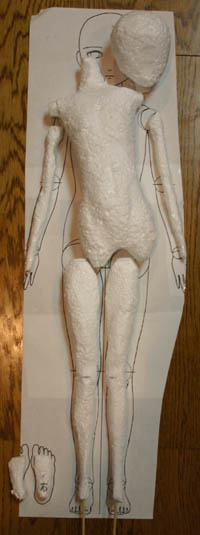
 | I owning all. |
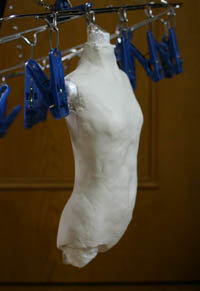 |
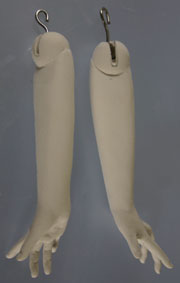
Fuselage, using a bamboo skewer through the shoulder hanger hanging to dry. hanging to dry.
If you leave people alone will dry even two or three days.
Dry in the same way as if this case, it sandwiching the bamboo skewers in the peg is dangerous.
The insert in the wheel of the peg. (It is hard to understand ... but also visible in the photo)
and on both sides would, in the power of the peg does not bear the weight of the clay,
will be broken fuselage made to fall much trouble. |
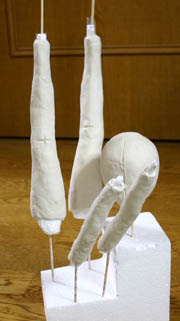 | To other parts pierced the bamboo skewer, fresh and set it aside to dry in Styrofoam.
Bamboo skewer pierced the ankle is better by far when the clay is dry. It may cause distortion and dry place, then I think you stand a good or hang dry.
|
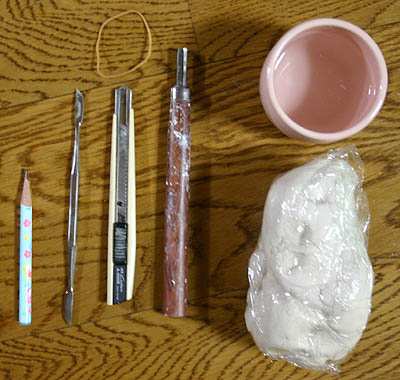
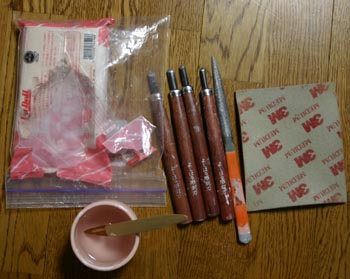
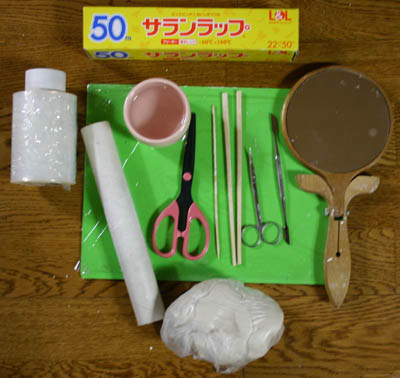 | Thing with this.
Normal wrap, wrap elongated for business,
rolling pin, water bowl, scissors, bamboo skewers, chopsticks,
small scissors, metal clay Bella, is a mirror.
What that is reflected in the lower Mirador . |
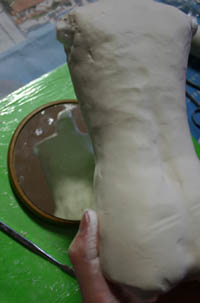
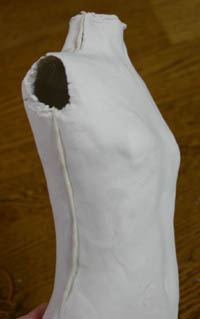
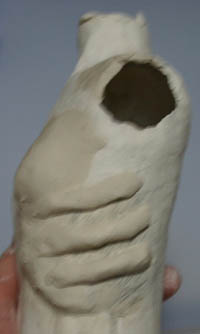
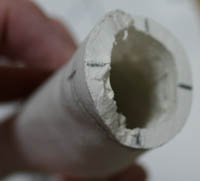
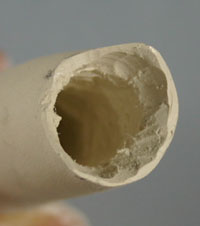
How to make the doll to extract the core from the fuselage 04
next retrieves the core from the fuselage. At this stage the core of the other parts will not pick up.
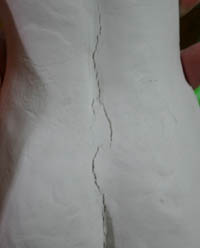
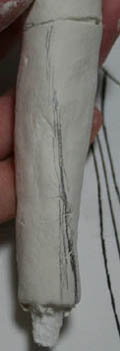
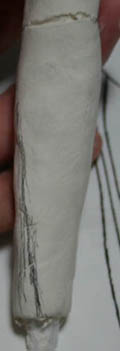
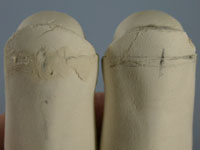
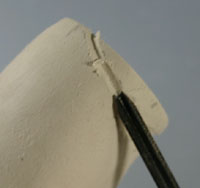
 | Check the fuselage was dry (and dry sound will hit), pull the guidelines.
At this stage, but is leaving noticeable cracks.
Please pull the guidelines so that the fuselage split in two. (Freehand is fine)
will be difficult to remove when removing stuck on that biased either. |
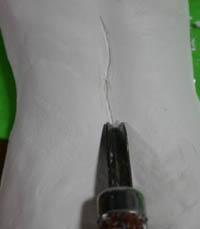
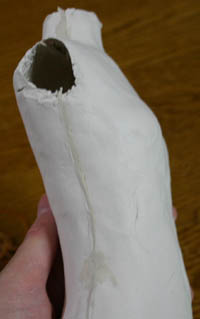
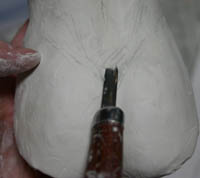
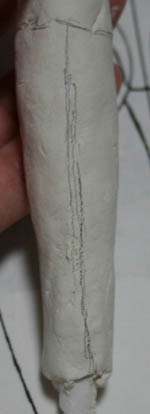
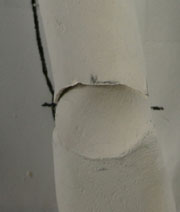
 | Along the guidelines cutter will cut with. will cut with.
It is unexpectedly cut properly, the router when using a disk saw was untested
may be cut, cut with a Rezaso is also good. |
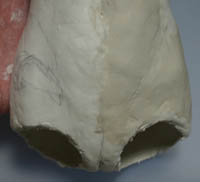
 | Inseam off just fine.
When removing, please make sure you have properly cut so easy to forget.
When you try to remove I forgot to leave off, and then broken or distorted shape made much trouble. |
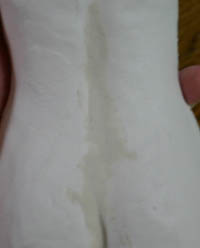
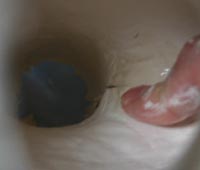
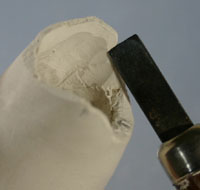
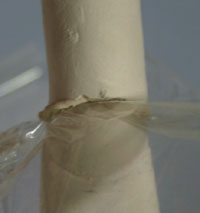
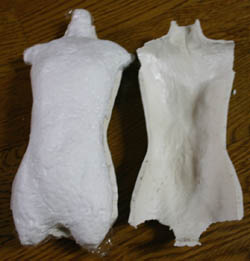 | Once the break has entered all around, we will remove it from both sides. |
 | You also stuck for After removing the foam, completely dry inside.
I also stick so strangely distorted remains were removed and dry.
(At this stage can still stick with glue and clay does not)
is less distortion in the first round if the wound dressing when stuck,
I have been fastened with a rubber band book or something.Distortion is not care. |
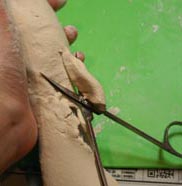
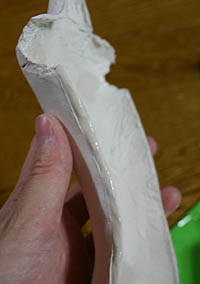
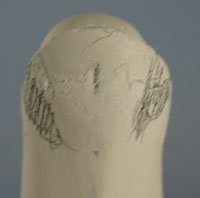
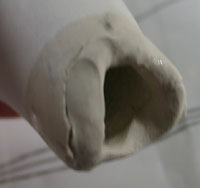
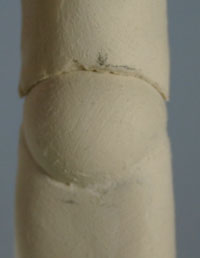
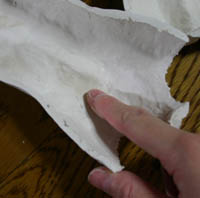 | Once dry, we will fill the cracks. To soften the clay with water, fills the interior of the crack. In addition, you have thick have at this stage if there is any place where thinner.
|
 |
Deep cracks may occur, such as the recessed portion. |
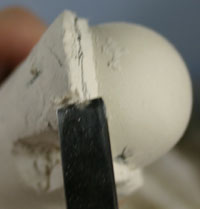
 | Deep cracks do not fall so far as clay, spread with the sword carved sculpture once. |
 | Then fill it with clay.
Since the crack or come out to the stage finish If left untreated the cracks,
put back with care. |
 | When you are finished filling all, and stuck the fuselage.
The clay stuck elongated to fit eye ... |
 | You stuck pushing. |
 | Protruding clay will drop with a spatula. |
 | Clay protruding on the inside, leave it stuck to expand from within. |
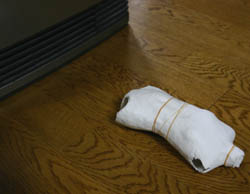
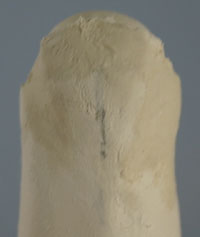
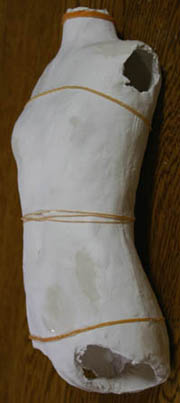 | Fastened with a rubber band and set it aside to dry Also, if you clean the seam.
Body is allowed to stand until the turn of this remains. |
 | Using this tool.
Pencil, Vera metal clay, cutter , chisel angle of the sword, angle of the sword,
rubber bands, water containers, El Miradoris. |
How to make ball-jointed dolls
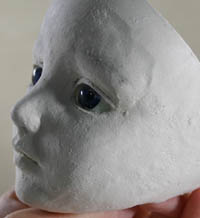
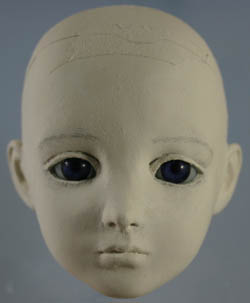
(girl) make the face 05 and
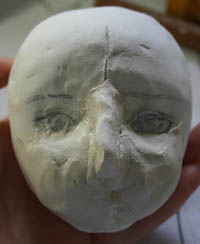
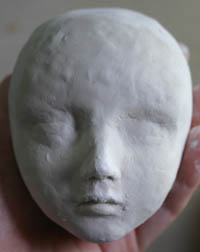
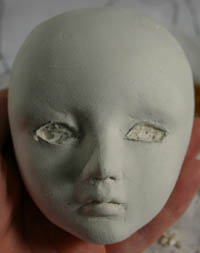
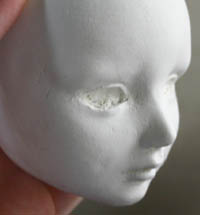
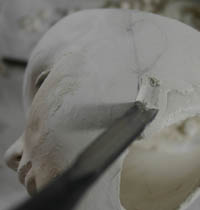
the following will create a face.
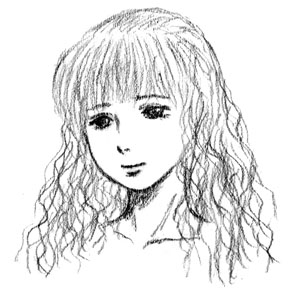 | Since there was a picture that tries to look like this,
while we will make the image of this. |
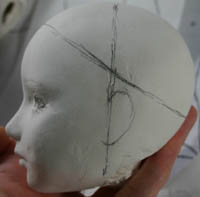
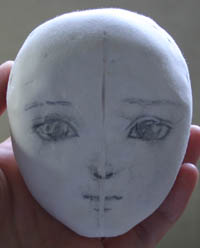 | Let's draw a face.
Based on the line of the median line, and draw while checking with mirrors so that the symmetry. |
 | First, we will have a clay bottom as you draw.
Because the foundation is dry, rub firmly stuck while the clay with plenty of moisture.
Line should be left to the midline so as to not lose.
Make while checking to see that line always, whether you are straight with a part. |
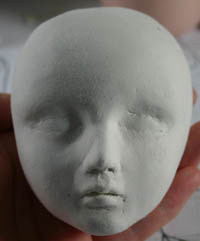
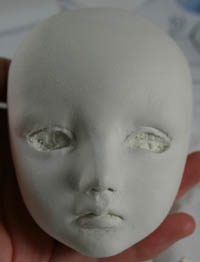
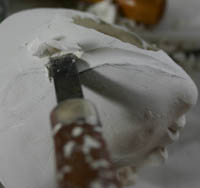
 | The prime on the cheek. |
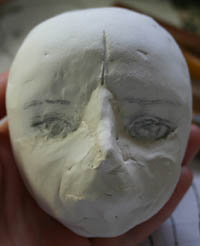 | You also serving around the mouth. |
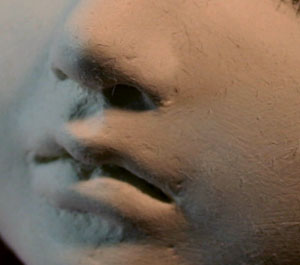
 | Pull the line from the mouth, we will cut the edge of the lower lip as shown in the photograph. |
 | Although only sharpened the edge of the lower lip of the mouth draw a line, it looks like this.
The modernized face and make your mouth. |
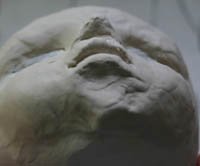 | Will be three-dimensional face and sticking out as if to make the nose and mouth when viewed from below. |
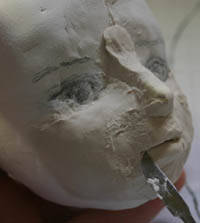
 | We will also make the nose. |
 | We will prepare clay to make the wings of the nose finely Bella. |
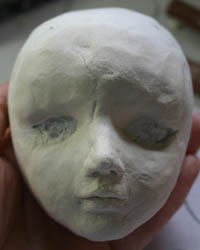
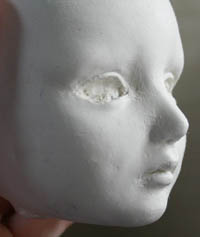
 | You prime the clay portion of the eye was supposed to leave the base.
I think make a good rounded feel that contains the eyeball. |
 | I trimmed a little around the brow bone to create a bulge of the eye. Asymmetric where you should leave or mend the mirror here. Do it within a soft clay is easy. Around the eyes to adjust, so after you turn on the eyeball, now If you could pass dry symmetry of each part, only the balance. Small parts or other parts of the face will go back while shaving. If you want to take the time to make the face, and sealed in plastic bags when you save, you can make over many days. Is it safe to make over about a month.
|
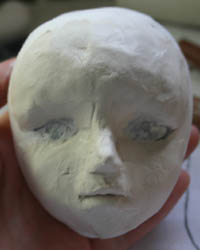
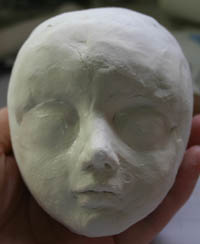
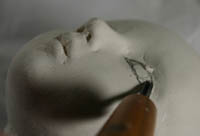
 | Dry, was roughly sanded.
File is something like a sponge back is turned is easy to use.
The firm was also sanded surface.
This file is written or 3M. In this case it is of medium and fine and fine use. use.
If the sandpaper is used to turn around 120-320.
Be careful not to crush parts.
Also, when the cut is always dust mask to Please do. to Please do. |
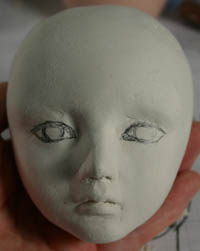 | Allows you to draw with a pencil under the eyes where to put eye.
At this time, to make sure that it is drawn symmetrically with mirrors. |
 | The sculpture carved with a sword as the underdrawing.
It is easy to use small triangular sword. |
 | Was carved. |
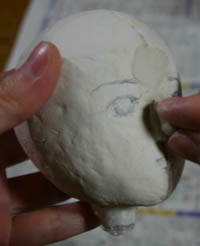
 | I had the feeling it was cut left and right sides of the head is too small ledge to assign eye.
If the eye is quite large for the face, you will like the photo on the head until now.
(Eyes for example this as much if there will be a common balance) Dari crafted around the eyes, clear eyes so funny place of balance, we will modify a little at a time where there is not enough meat. Is a repeat of ... dry dry also have cut back.
|
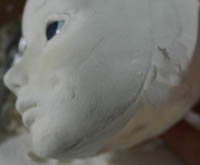
 | Was able to roughly sanded. |
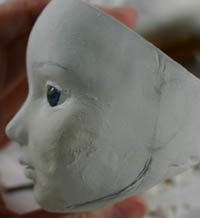
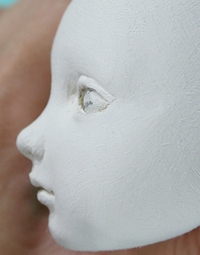 | Profile has become something like this.
Nose, upper lip, lower lip and chin this line as a good balance is to be connected with. I tried to change the creative potential of this photo only in recent years. When the nose is high brow bone with a higher first, fill the indentation between the eyebrows and nose when viewed from the side. I think that may be helpful or sculpture of ancient Rome.
|
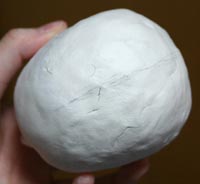 | The file also furnished in place of the crown has been beaten. Once trimmed, try to measure the head circumference. Adjust the appropriate size and head circumference of 23.8 to 25.0 Dolphy, so much seems to centimeter. It can be used wig and convenient place to fit head circumference a doll on the market.
|
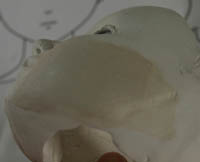
 | Check the balance when viewed from different angles. |
 | Carving is deeper. |
 | Check whether has become a three-dimensional look from below. Where the fine will go after you turn on the eyeball also made.
|
How to make doll eyes, put the head divided by the 06
following by dividing the head into the eyeball.
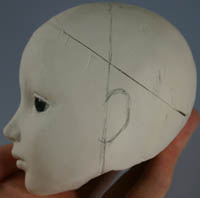
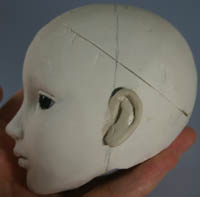
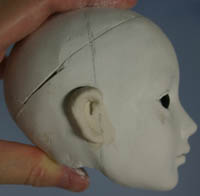
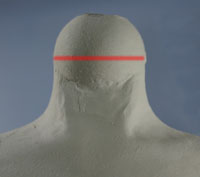
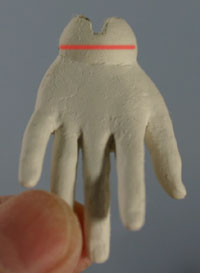
 | Draw a line in the middle of the neck to fit the drawing. |
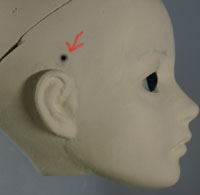
 | Draw a line to match the position of the ear.
Is the length of the ear from brow to nose around.
Then, draw a line through the top of the ear. |
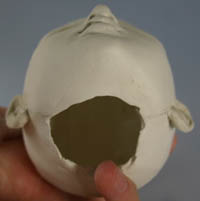
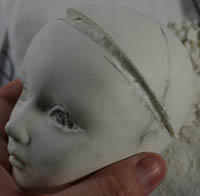 | Cut has entered. |
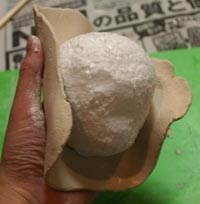
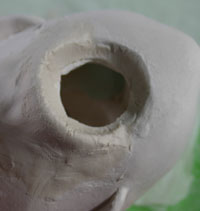
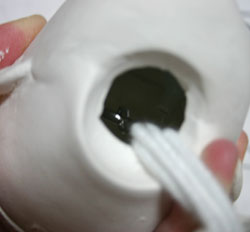
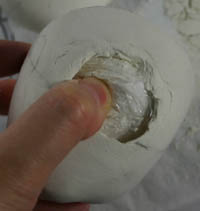 | Remove the contents and press the Styrofoam from the hole in the neck. |
 | You have written a landmark of the junction to the head. A thin place, you may want to adjust so that the inside of the head evenly.
|
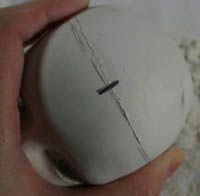
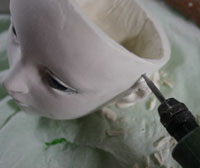
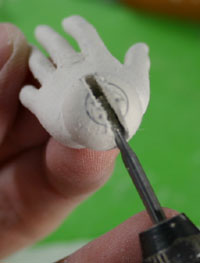
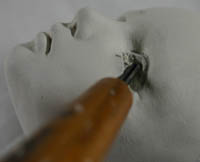 | Next, cut the clay in the eye. Chisel is used with small swords and sword flat triangle.
|
 | I go through.
This is pretty much, I opened a hole in the router. |
 | The next cut will have to enter the eye from the back.
The sword convenient flat round chisel. |
 | We will cut back from the table, looking at the thickness of the eyelid.
So that the name is cracked eyelids made very much trouble and they focus on,
you will work with care. Kuttsukere is okay if that happens ... If you are in the clay |
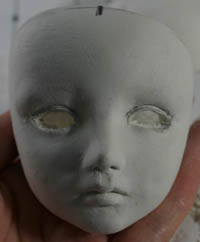
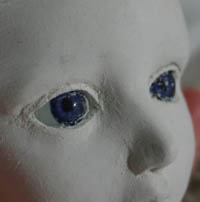
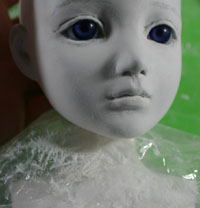
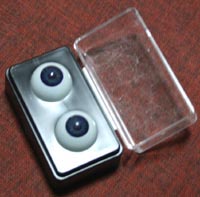 | When I shaved hole, try put a temporary acrylic eyes.
Is commercially available cheap, with the eye that is several times more tentative. This is 18 mm in diameter. Is the choice of the eyeball, close to the size of the iris image depicts the black-eyed Once elaborated eyes please try make sure. Although many commercially available eye are sold at the size of the diameter which also includes pewter, because it affects the impression that the size of the iris, the eye is selected by the size of the iris. And phase of a commercially available acrylic glass eyes are often slightly larger than the radius of the eyeball the size of the iris. When you buy the eye, please always check the size of the iris. Ruler and measure to borrow if the shop. Be sure to check in the mail order.
|
 | The clay stuck to the rod extended from the back. |
 | Turn on the eyeball. Feel pressed to fit in the eye hole.
You also cut the back if you have not tried putting bubbles.
While the eye or uncheck, we will prepare the overall shape of the eyelids and eyes.
I see from the table without his eyes met the eye hole, is it that the hall surplus
is undignified. Filled with clay as will fit. |
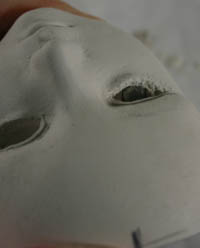
 | Once you have determined the approximate location of the eyes, and dry once in order to fix. |
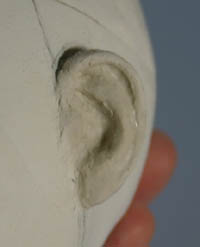
 | We will make a portion of the gill while dry.
Jaw line has been drawn with appropriately like this ... |
 | The sword cut in the flat circle along the line. |
 | Towards the back of the head with a sword will cut more flat. |
 | Was shaved.
Recessed behind the ear is suddenly in humans.
In the image to make it. |
 | Arrange the form with gills. |
 | Once the clay is dry on the back of the eye, when the soft part will continue to make that could not be arranged.
I think it changed the image of coming face and put the eye,
will image closer to the face while repeating or dry or cut or have. |
 | You can try pulling eye brow line to draw and to make sure the image.
Now something like this anyway. Head is not yet closed. Will close when you're adjusted to the temporary connection, will pull the eyeball at that time. Eyeball is doing in the way to put through the hole in the neck at the end. It is recommended to clean because you can also finish around the eyes that way. I think in this way so that some people just tricky, when you want to leave the eyeball will continue to work with some masking tape to protect. Head is divided by medical tapeto stop temporarily in place.
 |
How to make the doll to create a 07-ear
makes the ear.
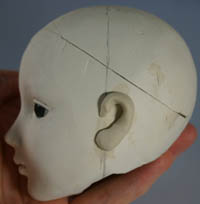
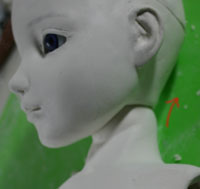
 | Draw a center line on the side to match the drawing.
Shape of the ear is from the line of the jaw have led ... like this, making it slightly diagonally.
Maximum length is much below the nose from the brow.
Draw on both the left and right. At this time, please make sure that you are drawn to the position to the left and right. Because even a good photo of my ears, the shape of the ear article, please provide. Let's have a picture of both ears to reverse left and right on your PC. I think a good while to make sure a sense of three-dimensional look at the ear of myself in the mirror with it. Following the previous head is divided bymedical tape will have been temporarily in. I think also to see the overall shape of the head is a good place to stop and provisional.
|
 | You stuck a clay stretched out long and slender.
Aware of the portion of the earlobe, one should be left slightly thick. |
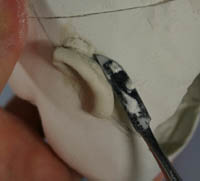 | In earpick spatula and will continue to the shape of the ear.
Edge of the ear, so curled inward slightly, create a form, while aware of it. |
 | Once you have a border, and prepares the form of upright ears.
We will make a stuffed inside the ear in the clay when you create a sharpened edge. |
 | I made a rough flow.
I think a good groove with a stick and make work.
And will make it seems like there is no angular place.
You have also made a round in front of the ear part. |
 | Flow is an image of like this. The shaded portion in the groove has become.
Point making them part of the uplift has been white.
The Fukumimi or to your liking.
I have so little natural earlobe (!), It will always make conservative earlobe. |
 | Make the same way the other side.
Place the clay in the form of elongated ear first, and prepares the form it stuck. |
 | Check to see whether that is symmetrical at this stage. |
 | Verify the target seen from below.
We will also make the contents of the ear on the opposite side when did all right.
I make out the trick is soft clay. |
 | I made left and right.
Some deviation because it often heal sanded,
clean and thoroughly dry before you file poppy.
Sanding sponge medium , fine use.
If you notice the shift of the position of the ear after the dry, we will move in Soi ears.
So ugly when poppy file later and stick it in the bond at this time,
to the side into the clay by digging a hole in the head, stick file of coarse from scratch in,
you to stick them fit tightly . This time was created using a spatula, a stick crafted. It is useful also make a fine place earpick.
|
How to make ball-jointed doll body to create a 08-
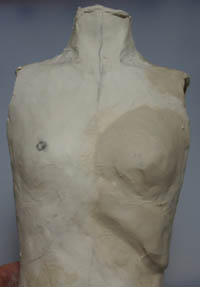
create a body.
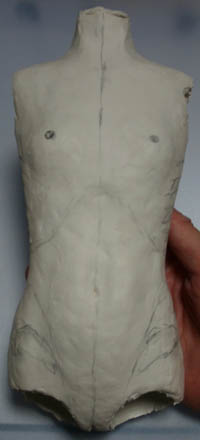 | The body is viewed from various directions, sanding will make sure to fix the distortion in the cut. Place to draw the center line of the body to fit the drawing. You have drawn so that the symmetrical position of the bones and muscles. will make sure to fix the distortion in the cut. Place to draw the center line of the body to fit the drawing. You have drawn so that the symmetrical position of the bones and muscles.
|
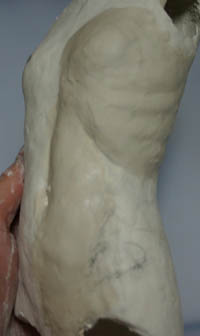
 | You have drawn the mark of the ribs on the side.
You have also drawn the pelvis. |
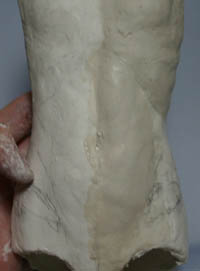
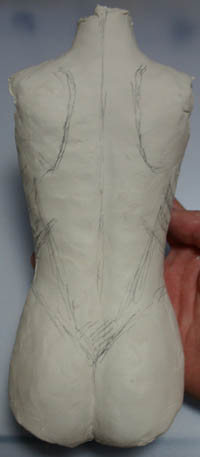 | You have painted a landmark by pulling the center line of the back side as well. |
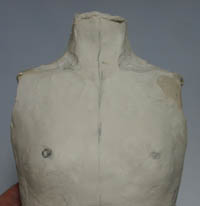 | First, cut out the shape and chisel in the collarbone area.
Once cut, and prepares the form by adding the little clay. |
 | We will put the clay chest, ribs. |
 | When you make the ribs, place the rod-shaped clay at an angle as shown in the picture ... |
 | The leveling and crushing. |
 | Will also create abs. |
 | In working my way towards the solar plexus recessed ... |
 | Create a protruding part that of the pelvis.
The left mark left because you have not done anything yet,
has the clay part of this triangle. |
 | Was able to roughly one-sided. |
 | So that the symmetric and the other one to make.
If you make from dry seemed to crush the side would have made earlier.
When creating a one-sided, symmetrical or always has been, and then work on making sure that the mirror copy. |
 | Make the back from the front is dry. Ass with a sword carved sculpture, carved in place so that the inverted triangle on top of the line in the ass also.
|
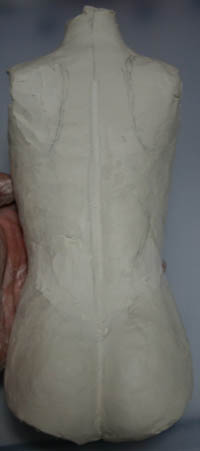 | Line in the middle of the back is recessed.
You have carved straight flat circle with a sword. |
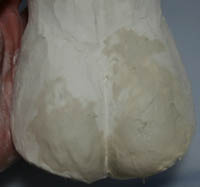 | We will make the shape of the buttocks. |
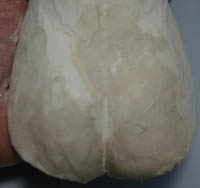 | On top of the ass because you are not extremely depressed, put on average packed clay.
(Please refer to photos of naked people) |
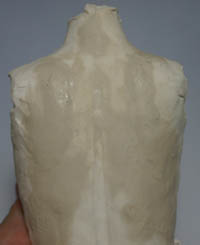 | Will also create scapula.
↓ You prime the clay to shape this. [
|
 | When you are back once dry front, coarse sanding sponge multiply.
After re-sanded is the portion of a vacuum cleaner sucking the powder, has been uneven.
Will continue to be the ideal form of repeating it again ... poppy dry sand. |
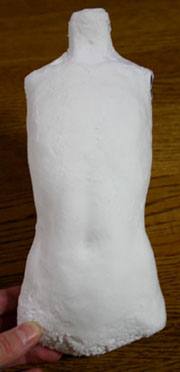
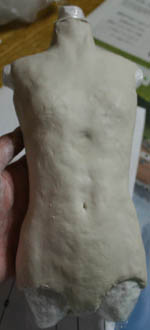
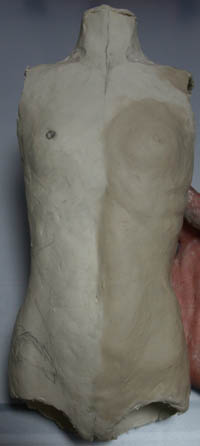
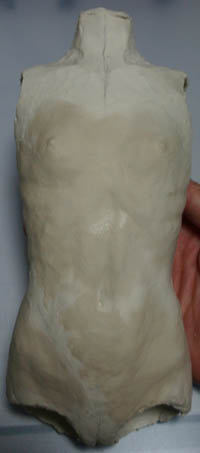
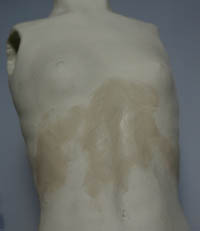
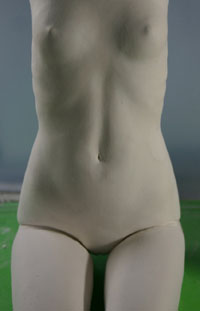
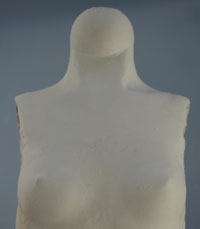
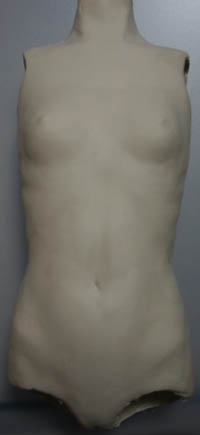 | I was able body anyway.
The strong contrast in the image click will be displayed. As points, thorax, is out front unexpectedly (such as lean back ...) (because there is no dent sternum) of abs-dent does not extend to the chest and neck muscles, the neck extends to the right next to (but not head on straight) that the neck is (good and cut along the muscle) there is unevenness in its own way 's not just a tube at the bottom of the rib, flank and is Tsunagere if gently, discomfort do not have much good to be aware of the shape of the pelvis (to make so many polite exposure), collarbone and may make reference to the photo of the man of upright
|
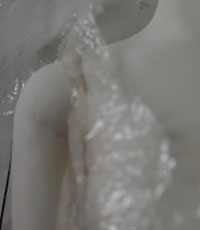
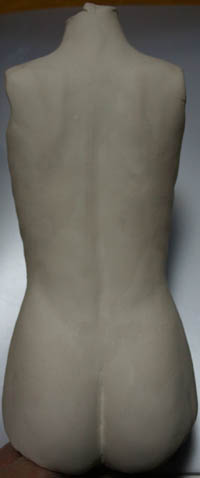 | Back. |
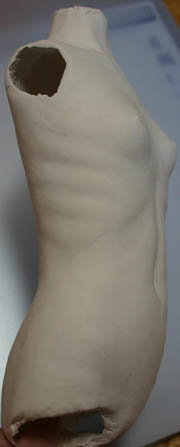 | From an angle. How to make the body when there was a material something is good. It would be nice to see it if you also make the body create a writer who liked dolls, there is a lack of such material is so small as image viewed from different angles. In addition, the writer's body in some cases because often "lie" that contains a writer's interpretation, it is not good mimic easily. (Mine is particularly so ...) doll's Diforume writer has been a significant force met and molding their own is extremely beautiful but very well and is something you can not do it to imitate the amateur. Because of its beauty comes from the skill of the modeling of the core, there is no way to reproduce only the surface to imitate. People for the first time, It's a good thing to have a document of flesh and blood so as much as possible. I just can not figure muscle is a very good modeling. (Scary body becomes too aware of the muscle)
|
 | Thing with this. Chisel and various sand , coarse sanding sponge , El Mirador is. I think that comes out is full of scrap clay soon, let's not discard collected in a plastic bag. Return to the sodden clay If you put the water. Let's reuse the world. Also, when you work with chisel sharpening dust mask is recommended that you make.
|
How to make ball-jointed doll
arms and legs to create a 09-
make arms and legs.
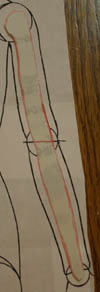
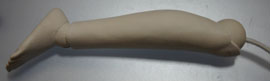
  | First ... from arm.
The photograph is the right arm. Figure and viewed from the side, as viewed by turning the front of 90 °.
When stretched out straight before hand, as it was on the palm, the inside of the elbow can be seen,
is that state.
Line running over from center line on the side of the elbow joint,
not toward the center of the front of the wrist. |
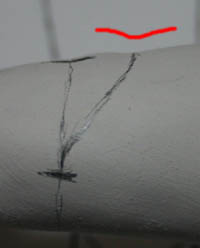
 | You have caught a straight line from the elbow.
Outside and inside of your wrist, you should come to the position of the symmetry line is drawn.
This is seen from below the wrist. Point are shown in the lower end of the line of the inside and outside of the arm is red. The point of this line is 2, it is a line of bone called the ulna and the radius of the two. (From the measure and measure two feet one and stuck to what the little-finger side bone of the little finger is the ulnar. From the elbow) has to be able to operate the arm is that there are two bones, called "twist". Whether that state that the bone is twisted, you can see from the surface. By twist of course, this line will be moved if flesh and blood. The doll is so moving and do not create a line, you can create the most natural state in the line of the demo.
|
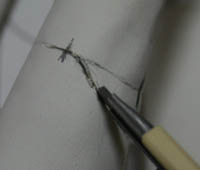
 | Along the line carving knife sharpener with you.
Made to remain on the mountain line. |
   | You have also cut down the upper arm.
Diagonal diagonal photo, front, from the inside.
Muscle has come out like this. |
 | The mark also cut to fit the upper arm.
Feeling shave the outside of the line.
You have to cut the inside of the elbow a little dented. |
 | Once you have the recessed portion, the next step is adding the swelling clay with. |
 | Photo viewed from the side the right arm. |
 | Make the left arm as well.
Line will be symmetrical. |
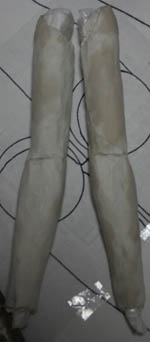
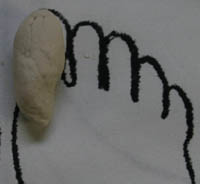
 | The following will create a foot.
There is a line consisting of the foot points.
Is a line from the lower thighs and knees.
Will be part of this line is out the most. |
 | We will cut along the line. |
 | Coarse sand in the sponge, and may be cut along the mountain part. |
 | Was cut along the line. |
 | Then you fill in the recessed portion by adding the clay, you can add the bulge. |
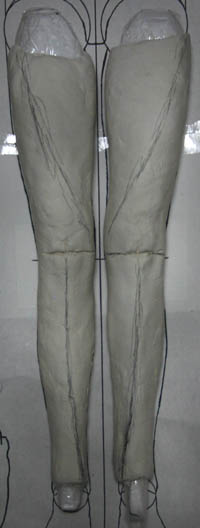
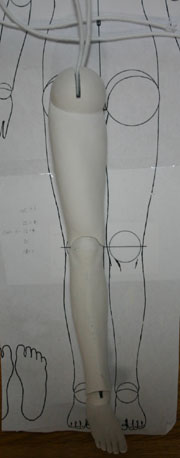
 | Place according to a side view of the drawing, the line is not enough memory. |
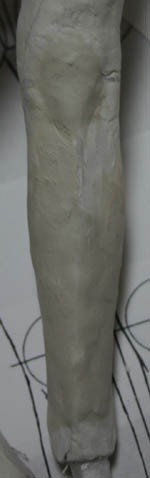
 | The clay also prime the thigh.
Will be large to fit together with the side view.
I think a cute mole on your lap, and Pokkori meat. |
 | If the base of the femur was shorter than the drawing, you have plus the clay to fit the drawing.
Part of the arrow.
Here you may wish to add before disconnecting the core is easy to make. |
 | Will also create knee. Do not bulge too much. After this it goes to detach a portion in the joint, around the knee is fine place to make. It is hard again and hangs up, I keep close to completion in the form prepared as possible before turning off.
|
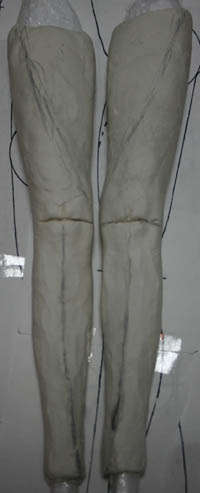
 | Dry, and prepares over a coarse sanding sponge. |
 | Thigh is good and make aware of the muscle.
It is a good figure to refer to the muscle.
Sitting properly and you can make a dent in the inside of the thigh.
When the hole is likely to fall and make a dent in, you have cut from dry clay from the back. |
 | Running diagonally across the thigh muscle is the point. |
 | You should confirm all side-by-side balance. |
How to make ball-jointed doll
arms and legs to extract the core from 10 ·
Disconnect Remove the core from the joints in the arms and legs.
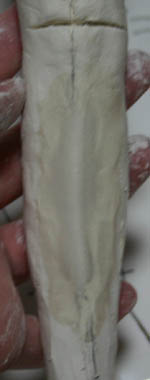
 | Draw a line in accordance with the drafting of the knee joint.
Write a landmark in front of the place. |
 | You have written a landmark side, even behind.
4 is a landmark to divide the knee joint. |
 | This time I'll try to make a mountain type joint.
If this is the first time be easy to make is how to cut a straight line.
Differences in only cut a straight line even if the knee that, after work is exactly the same. Draw a line to be mountain type. The height is to be the same on the left and right.
|
 | I have become the highest type of the mountain, passes between the meat and knee on the knee. |
 | Cutter will cut the curve at.
Who had cut in a straight line If this were so difficult is easy to make.
Behind the knee, so cut in a straight line, that part of a child of the thin blade craft work in the. work in the. |
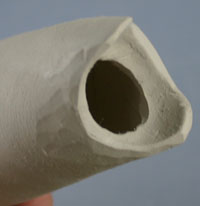
 | Was expired.
You would Nejiki~tsu in each Styrofoam. |
↓
 | Because the lap wound, clean exit as shown in the picture and to work out. |
 | We will cut in the line of the same arm as the elbow joint.
Are easily mistaken for the left and right arm and write as can be seen.
(You have also written the wrong foot when it was) Please write the landmark of split 4 In addition, in the same way as the knee.
|
 | The thin blade cut a child of the craft. |
 | Knee joint is cut.
Please write to the cut surface the line of division 4. |
 | I owning all.
Seems a little doll will be turning off the joint. |
How to make the doll
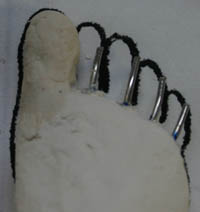
to make the hands and feet-11
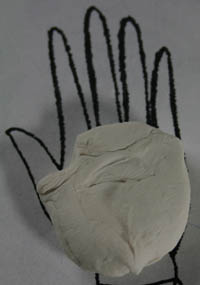
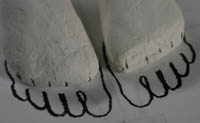
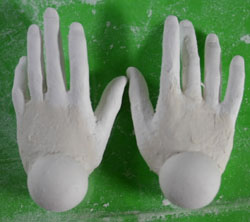
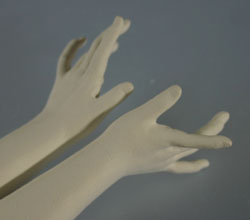
will make the hands and feet.
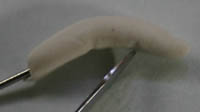
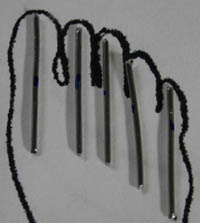
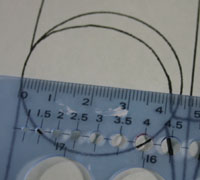
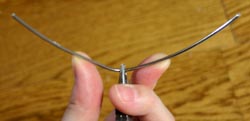
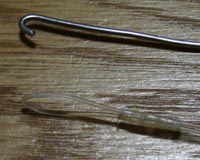
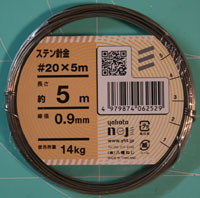 | Prepare a narrow stainless steel wire.
This is 0.9mm (♯ 20). |
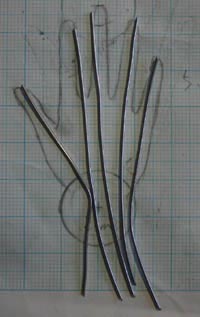 | Turn off the wire a little shorter than the length of the finger along the drafting of the hand.
Part of the wrist is left with a margin. |
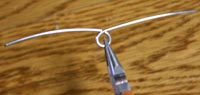
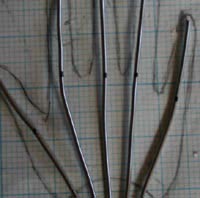 | Part of the base of the finger is marked with the magic.
Here is the boundary between the fingers and palm. |
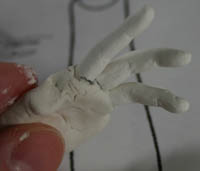
 | The bundled with cellophane tape to the root. Note that the position does not move. |
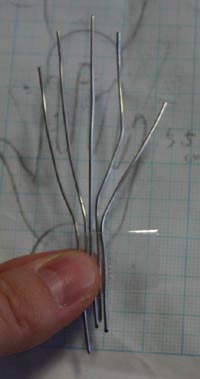
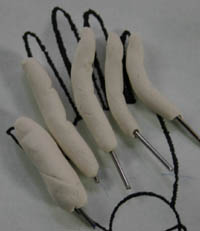
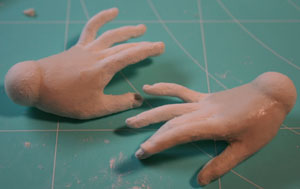
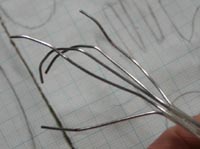 | We will create a form to bend the wire.
Or finger, you should see a sign of how far the Magic.
Create a form while considering the breadth of the joints and back of the hand.
Do not forget the fingertip wire that you have short, with a margin. |
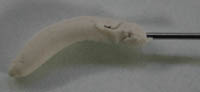
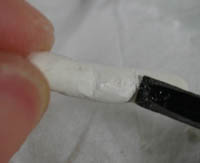
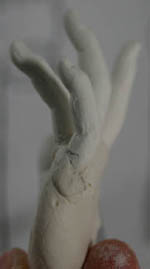
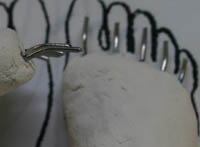
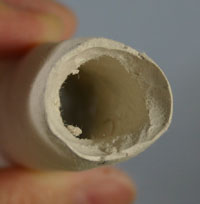
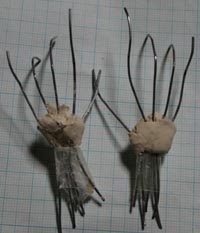 | Dried clay at the base of the hand with the first, it will secure the wire.
Since the cut wire to fill later, heel of the hand crafted not so much is good.
Heel of the hand will make a beautiful place to make the short step, fill in off the wire. |
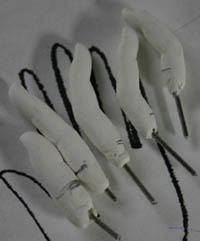
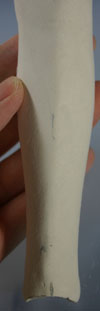
 | You go through the wire elongated clay. But it is also way easier to stick to the clay wrapped around the wire and cotton tape for medical use, because they may not familiar with, the contents would come out when polished later, this time will do just wire.
|
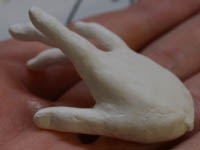
 | Please be dried in this state anyway. |
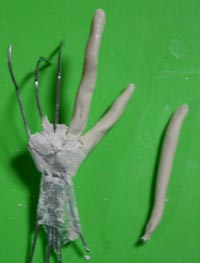
 | Draw a line up to where your fingers or in accordance with the drawings, and then stuffed the clay to the back of the hand there. |
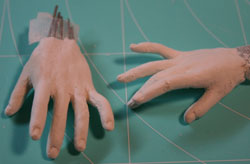 | Seems it will be aware of the clay and the molar of a finger joint.Where fine craft sand and furnished in a. You can make once you get used to, almost disappears after stage base coat and polish and put a nail or other. From the modeling the "shape of a finger nail that" recently, has made feel to dig up buried in the last nail had. and furnished in a. You can make once you get used to, almost disappears after stage base coat and polish and put a nail or other. From the modeling the "shape of a finger nail that" recently, has made feel to dig up buried in the last nail had.
|
 | You can also plug a book from a book to make your fingers.
For people who get lost in the face of the hand. Is put on the sign of the joint to turn off the wire in the same way as on the recipe.
|
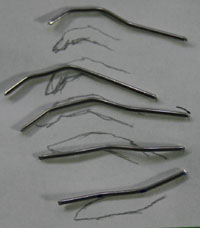 | While the image of the expression of hand, bend the wire one by one. |
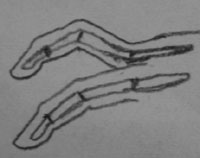 | Image ... wire comes in like this in the finger
and note the angle of the base. |
 | Make a finger in the clay. |
 | Route the wire. |
 | With a spatula and make the joints. |
 | Allow to dry anyway. |
 | Once dry, chisel sharpened in the shaping.
You also write at this time to make the joints of the fingers. |
 | I also made all the joints of the fingers.
Work is pretty tough ... |
 | You have polished when dry.
Since most end here, but included to make a finger, after work might be easier. You have to mark the base of the finger to match the drawing.
|
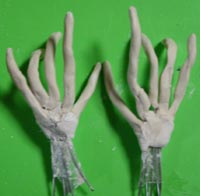
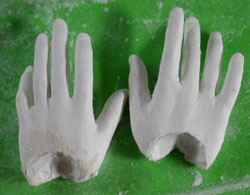
 | Make the back of the hand. |
 | We will insert your fingers one by one. |
 | The shaping up convincing. Shed to secure the base of the finger instant adhesive once dry.
|
 | Re-place unnatural in conjunction with a back of the hand. |
|
| Once finished polish dry. How easy is your favorite place so controversial Which various please try.
|
 | Will also create leg.
And a pencil to mark the positions of the fingers to fit the drawing. |
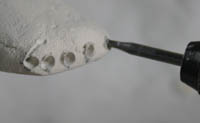 | Mark in accordance with the router in a hole. in a hole.
When there is no router is a hole in a fog. |
 | Turn off the wire core of the finger to be in accordance with the drawings.
You have marked in the Magic to the base of the finger. |
 | Into the drilled hole.
After inserting, and secure it with adhesive moment the root. |
 | Once adhesive is dry, you have to bend the wire to fit the curve of the toes.
Careful not to stick the tip of the wire to the ground. |
 | Make the shape of the finger in the clay. |
 | Reconnect the wire, and stuck the root. |
 | You have also made at this time the back of the finger. |
 | Belly of the finger is to become the same height as the soles of the feet. Then, once dry.
|
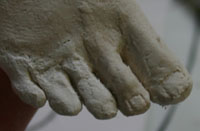 | Once dry, we will make the upper portion of the finger.
It seems to be aware of and will be joint. |
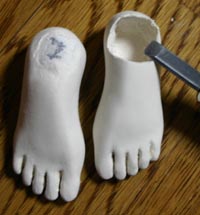
 | The balance and prepare the finger, the shape of the entire foot. Little finger and thumb, and I think it will be and seems to be inclined to make the inside. Soles of the feet are sharpened on sandpaper, place it so that it lies flat. If you do not want to unnaturally flat, the more rounded sanded.
|
 | Holes to put part of the ankle joint, leave out the core of styrene. If you had broken a finger while you work, instant adhesivestuck in you. Will be difficult to break than to fix in the clay.
 |
 | The soles of the feet is like this ... |
How to make the doll
to create a neck joint 12 and
from here is the moment of truth. Make a joint.
An important point, the joint rather than with each other in support of that part, on creating a joint
is to make sure that you know that the match and received support in the sphere.
Non-appearance of the joint is not just a decoration that is received and the sphere. What are you really just acts as a joint sphere and received.
In addition, the sphere does not work much too small. Because of the bad shape or too large to say,
I think it's important that you consider the balance at the time of drawing the design.
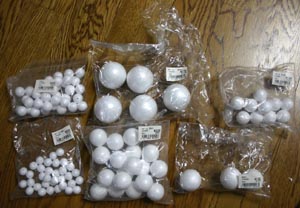 | Use to create a ball joint first. We will make according to your drawing,
please go to consider making the balance of hands and feet actually made.
If you have to use Styrofoam core 10,12,15,20,25,30,40 mm
to about 60 centimeter doll is too late.
Is 2-5 mm increments, so this difference is surprisingly large,
I think size is a good idea for more than justified.
After too many balls or make, if he make a very large sphere
, and I think had made it easier to take the type.
How to make the molded Styrofoam spheres linked fromeye expressions tiger doll garden
has been featured in. It is so handy, even the amateur can, is so convenient. |
 | And measure the diameter of the sphere of drafting. About 60cm dolls, this one 2 44mm ×, the ball of the hip pieces 2 28mm ×, each 2 28mm ×, the ball of the knee joint of the shoulder joint ball each 2 18mm ×, the ball of the ball of the ankle joint elbow each 2 18mm ×, ball joint neck pieces 1 30mm ×, 2 15mm × sphere of individual wrist will be making a total of 13 pieces.
|
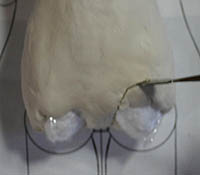
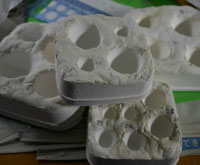 | Fit the size you would make in the plaster mold.
How to make a sphere in a plaster mold is here . |
 | Type of ball size is not available, we will create styrofoam balls wrapped in clay.
(Is it safe to make polystyrene spheres in the core of all of course) the thickness of the clay of the sphere requires at least 5 mm. Use a small Styrofoam ball core 1cm in diameter than the sphere of plans to make so. When creating a very small ball, do not have to put the core. You may use these guides when prolong lot of things, such as chopsticks and pencils. Use the guide If you wish to 5mm height to the thickness of 5mm. If you want to have a half-hearted or even the thickness 8mm, can be accommodated by changing the thickness of the guide.
|
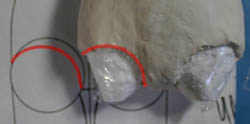
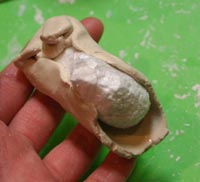
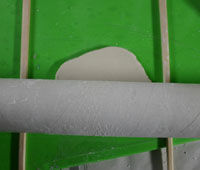
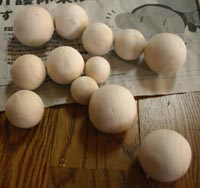
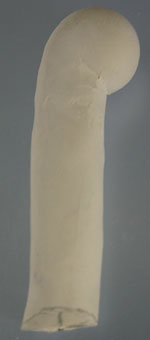
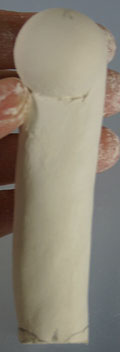
 | The left is wrapped in clay, the right is its core. |
 | I think that I can wrap the ball well when cut with scissors and wrap while diligently. Sphere of the same size, we will create to properly align the size of the left and right.
|
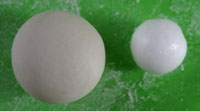
 | Once dry you can round, filled with clay from the recessed portion of it,
and prepares the form to look like a sphere as possible.
Dry it again, will continue to be a true sphere by filing a sponge brush.
The first is a coarse, the next step is polished with a squinty eye.
If you go shaving the sight inflated by turning round and round, will be a sphere. Make over time so that as much as possible without compromising the true sphere. If you do not make the exact sphere of joint, and then a lot of trouble later when you create a joint.
|
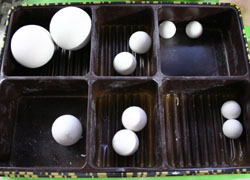 | Which objects or parts which ball and write with a pencil. Is easy to understand and keep in a box of candy further fractionation.
|
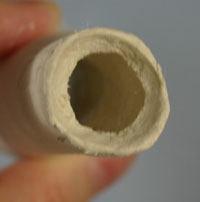
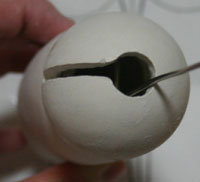
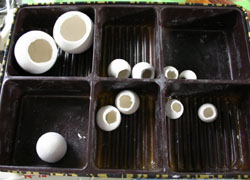 | Once you have a ball, mark the circle with a pencil, drill a hole carved in the chisel.
I have a hole in the flat sword sword flat and round. The size of the hole open, if you do not get bigger than the size of the cavity of the stick part is it does not matter how big. After opening the hole, the core issues in styrene. If you see cracks in the middle, is filled with soft clay.
|
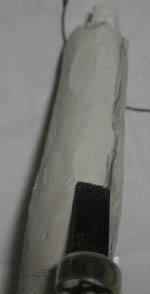
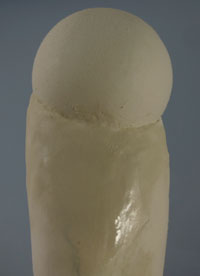
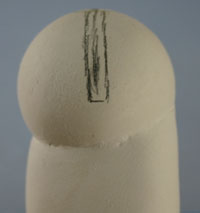
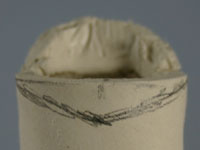
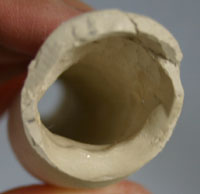
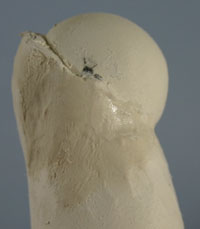
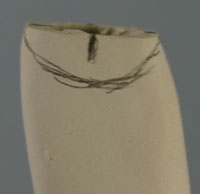
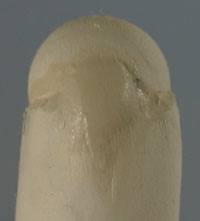
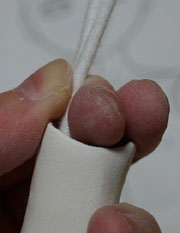
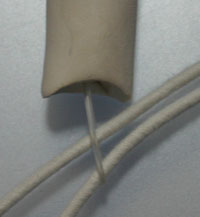
 | First, you create the joints of the neck. Try the neck and stuck the ball, if you do not fit as drafting and height of the cut with a sword over the neck sculpture.
|
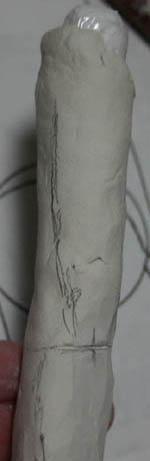
 | When the shaved neck, and stuck a rod-shaped wet clay extended to part with water and let it dry before stacking. |
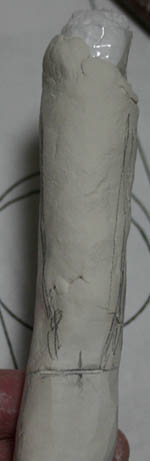
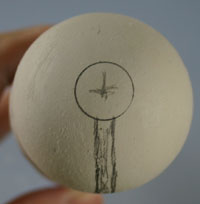
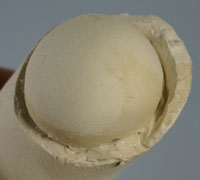
 | Place the ball of the neck there. You can adjust the midline to the sphere so that they can.
|
 | Arrange the clay around. When the position of the ball was throwing off so, once in the state on the dry, and prepares the form and let it dry before stacking.
|
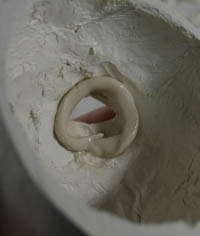
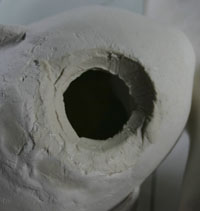
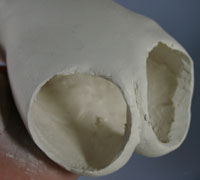
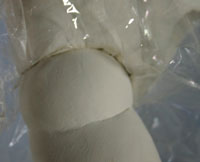
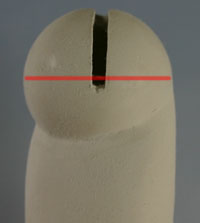
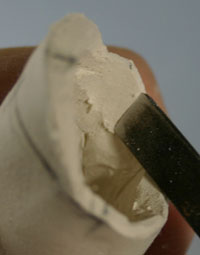
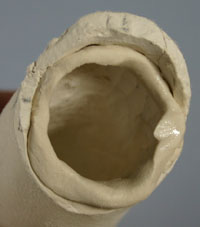
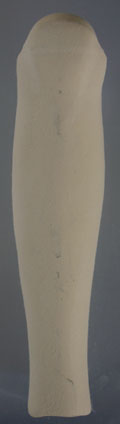
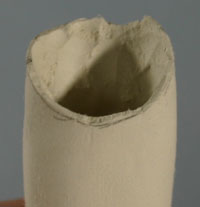
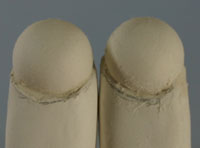
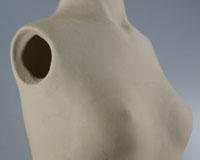
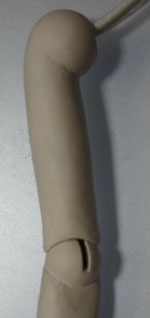
 | Received the following will create a sphere toward the head. Please do not become too long distance between the neck from the chin. The careful this area is easily confused. You stuck the wet clay around the hole with water, was extended to stick.
|
 | Covered with a wrap to more parts of the neck, and push to put the neck. At this time, in preference to adjust the height of the neck.
|
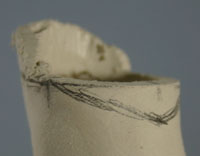
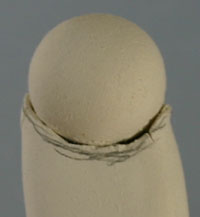
 | Cut off excess clay overflowing. The surface of the receiving think is going to be beaten, let it dry for now. Fills in the irregularities in the soft clay and let it dry before stacking.
|
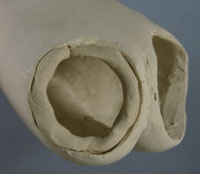
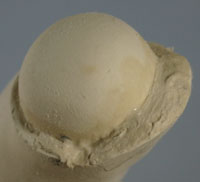
 | After drying, place reinforced with clay from the inside. |
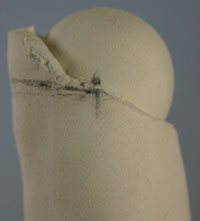
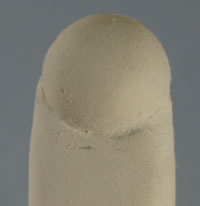
 | The shape of the back of the head also prepare further. |
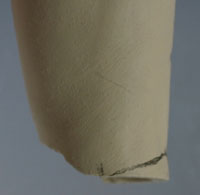
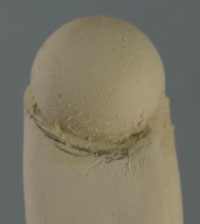
 | When viewed from the side like this ... |
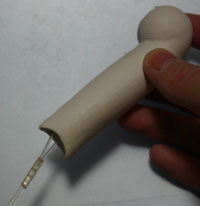
 | You to lead to joint and rolling of the neck. I think this way and become a clean profile.
|
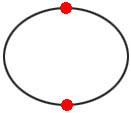
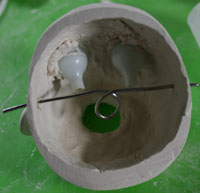
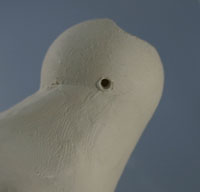
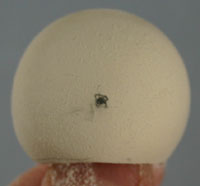
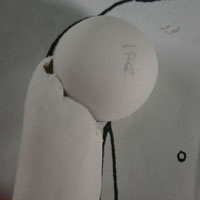
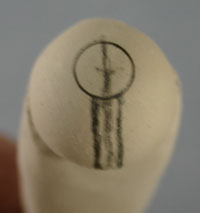
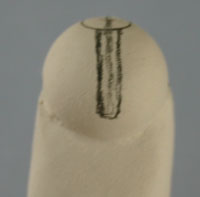
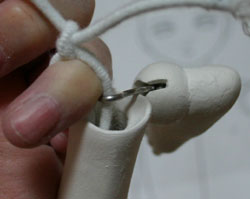
 | Following through the wire, make a hook where the rubber in the head. Drill a hole on the center line of the side of both ears. Which can be seen in the black point is where. Make sure that the position of the hole with matching left and right.
|
 | Router in a hole.
When there is no router is a hole in a fog. |
 | Turn off the stainless steel wire slightly longer than the width of the head.
The thickness is ♯ 16. The thickness does not bend easily.
Of iron wire, so ugly rust came out later, please always use the material does not rust. If you cut the center wire needle-nose pliers by pinching in, press from both sides.
 |
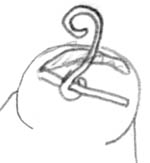
 | Make a circle in the center.
Leave the other parts of a straightened paper. |
 | Put one by one through the hole in the bent wire. Cut with the position mark the extra part, the tip of the wire enters both in the hole. At this time, the tip of the wire so that you do not out of the hole.
|
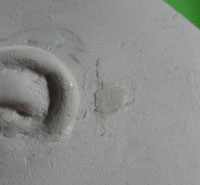 | The outer hole hidden packed clay. |
 | This will take some force to the wire toward the rubber underneath when through.
You have a lot in part reinforced with clay underneath so.
Part is lined in red. |
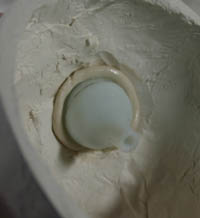
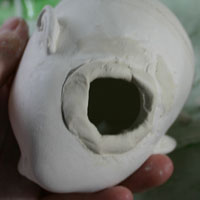
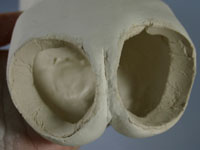
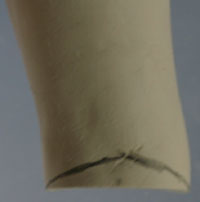
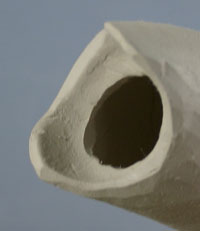
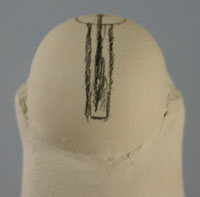
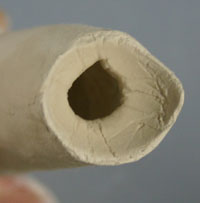
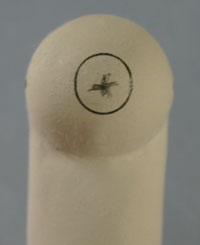
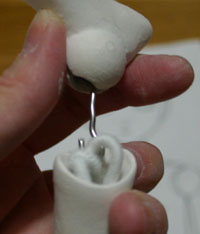
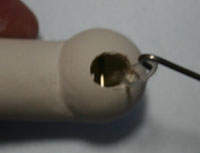
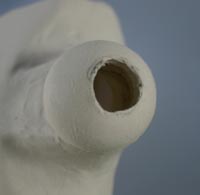 | Leave the neck towards the round hole in the chisel.
Is it safe to open a big hole so pretty part of the sphere is almost obscured. |
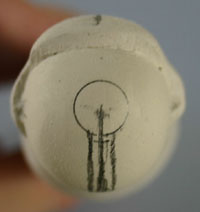
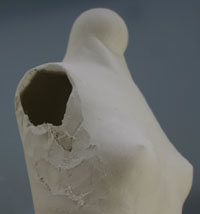
 | Place through the wire to the center of the sphere of the neck.
This is to distribute the force when it will take through the rubber later, is to prevent the pain of arthritis.
There is also the effect of preventing neck if it is a strange turn in the direction of head.
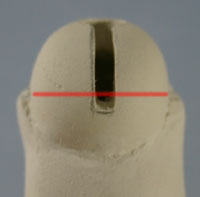
The ball will now stick to it all through a wire. Viewed from the side and open a hole in the center of the sphere.
|
 | Route the red wire as the wire.
In the same way as when you put the wire on the head and secure it with instant glue from inside.
The clay is also stuffed with hidden hole on the outside. |
 | Has become something like this when viewed from above.
Of the neck joint is now complete. |
How to make the doll
to make the joints of the hands and feet-12
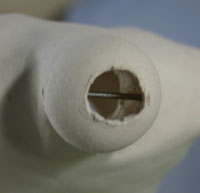
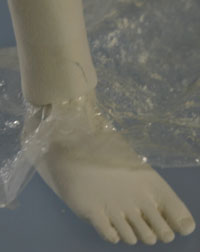
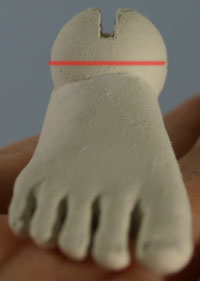
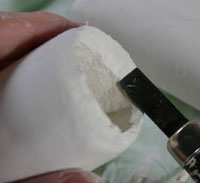
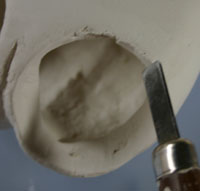
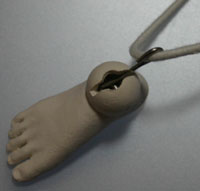
 | Part enters the sphere of ankle chisel place opened widely. |
 | Put the clay was to wheel and turn on the ball. In the balance of feel like ....
You may wish to heel is stable to a slight overhang. Once dry, arrange the ball around.
|
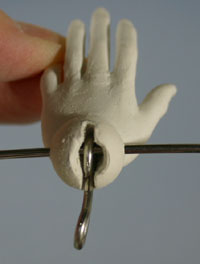
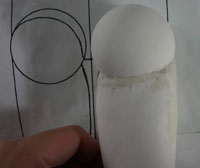
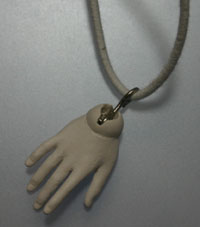
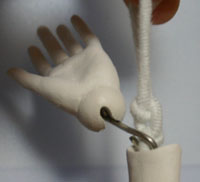
 | Hand, you have put the ball shaved off part of the core wire. |
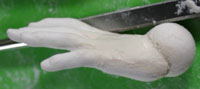 | You stuck the ball.
Sphere is more attached to moderate slightly upward from the wrist will be put straight into cute. |
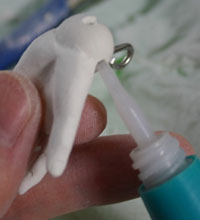
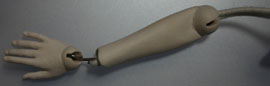
 | You prepare so that the natural seams. |
 | Had better not put a step back of the hand and the ball will be too cute.
Make to lead to a ball from the fingers to gently packed clay. |
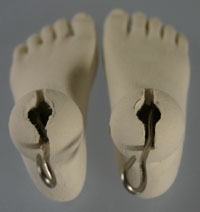
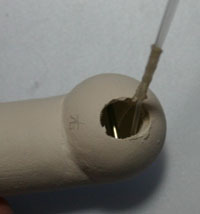
 | If you are stuck with a ball of feet and hands, the next step is to create a subject of the joint. Place in accordance with the drawing off my ankle.
|
 | You cut to size ball enters the inside. Convenient flat sword. |
 | The clay that stuck to the wheel towards the ankle, push down on the foot across the lap. |
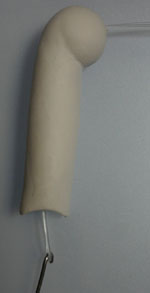
 | You are now received in the ankle. The height of the left and right foot so that you do not differ. Try standing side by side, fine if it matches the position of the knee.
|
 | Received will also create the wrist. Turn off the tip of the radius and ulna wrist according to the. There is a line drawing of the photo, with a pencil.
|
 | When turning a fine place, put a sword in the triangular groove along the line.
The sword scrapes along the groove in the flat after that, at hand is not crazy. |
 | You cut the ball inside to fit even the wrist. |
 | With the clay was in a circle, and push across the lap. |
 | Was able to receive the wrist. As no different from the length of the arm in the left and right, you should check side by side.
|
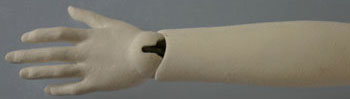
 | If you can not get into the joints of the wrist should be left in the hands and arms stuck like this. In this case the sphere will be crafted wrist to the elbow joint sphere, as described below.
|
 | The crafted for hooking the rubber ankle and wrist joints. And mark a hole as shown in the photograph.
|
 | Mark in the same way to the wrist. |
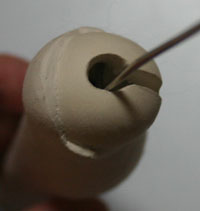
 | Opening the elongated hole portion of the joint is shown in the diagram. Follow the signs painted, routers in a hole. You then connect the hole. If the router is connected as it is sharpened. If you open a hole in the fog, chisel will connect between the hole and cutter. You can then spread to form a hole with a clean chisel. So difficult to clean and they spread out to form a hole such as a router, I had better finish in the chisel. Will use the sword flat chisel.
|
 | (Sphere does not contain a core) small ball, you open a groove divided by the router to make. |
 | I have put part of the hole ... I do not have to put even with
less reason. |
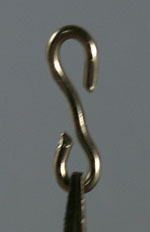
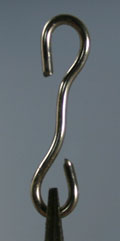
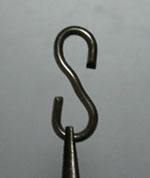
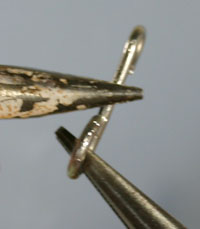 | The following can make the S hook and rubber. Appropriate amount of cut, the wire needle-nose pliers make a bend in shape. It is easy to make and use two pliers.
|
 | S Kang is towards the hand. The smaller of the wheel is placed in the wrist in a ball.
|
 | Then, through the wire for hooking the S Kang made.
Wire will contain something like photos. |
 | The wrist placed in a sphere S Kang, try through the wire.
S Kang If you do not get in the wrist if you dig a little more groove. If you make a small doll of about 30cm, S Kang is not taken into account. In that case, instead of the string through the rugged thin pipe (S). I use to solve the kite string. I think if you put a string, and easy to make better through the most recently ended finish also.
|
 | Turn off the wire, and secure it through the pipe (S).
You may at this time, they glue the S Kang and poured glue from inside.
In that case, you poured into the adhesive through the hole in the outside. |
 | Was able to left and right. But other than the groove portion of the hole, so as not to have open joints Itama is also moving in the pipe (S). There's also improve access to the sink or put a pipe (S) or after the adhesive. I think that may be omitted so that only some people make in the groove.
|

 | You should check the balance side-by-side look. |
 | If you are creating in conjunction with a wrist arm will be like this. |
 | Kang S is made in this way inside.
Use the rubber through the pipe (S) when assembling. |
 | S can also make towards the foot. |
 | The ball of the ankle through the wire also. |
 | Hook the wire through the pipe (S) in the same way as the hand.
Wire is fixed with instant adhesive.
I think the ball is larger than the wrist, through the pipe (S) when there is no trouble so much. |
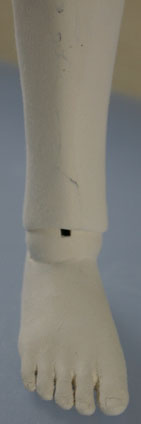 | The shaping of the foot, you should check the balance to put the ankle.
|
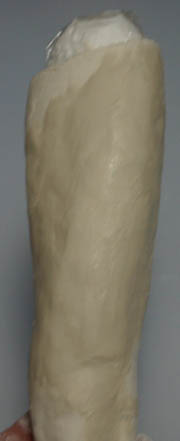
How to make the doll to create a hip 12-
 | Parts of the inner thigh is a chisel cut back in place. Flat sword is good. |
 | Make sure that the fit stacked with drafting, and drawing from the knee length and height of the ball.
Short or cut back the length of the femur from the top itself, does not seem to fit when
you cut further inside of the thigh. Should be able to deal with perhaps only sharpen the inside.
More than half of the sphere so that the outside. After the adjustment, to secure the ball of clay. Note that to be the same as the height of the ball of both feet.
|
 | The place is filled with clay that stuck when depressed unnaturally. |
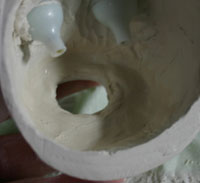
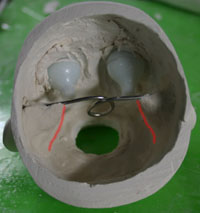
 | Received to make the fuselage side.
When the ball was entering layer, you have cut a hole in the fuselage and spread out. |
 | Adjust to fit into the same left and right fuselage only. |
 | The wet clay stuck to the side of the fuselage received, was to wheel. |
 | You push the ball in the thigh wrapped in wrap. The position is made in accordance with the drawings. Enters the sphere too, please so as not to or Too much bass. Also, please make according to the position of the drawing when viewed from the side.
|
 | I was able to receive both.
Will be dried once is still dirty.
After drying, the place is filled with soft clay unnatural dented. |
 | Cut in a straight line if the knee, you can stand loaded with parts at this point. |
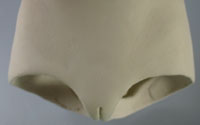
 | You have made beautiful part of the buttocks.
I was a little plus side also did not have enough width of the waist. |
 | The following is an adjustment to ensure proper seating. Try to put the body on top of the thigh, make sure whether it sit. If you sit do not seem to be caught is the base of the foot, you need to adjust.
|
 | The carving knife sharpener in the way of receiving. |
 | Also how the thigh, and cut a little bit the inside of the foot base, of the sphere. |
 | As soon as seating is like this. |
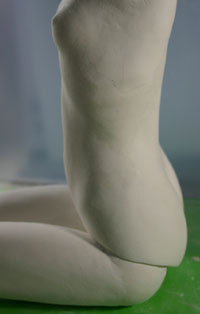 | When viewed from the side, torso leaned forward a little to much has been stable. |
 | Once you have adjusted, will also create part of the crotch. |
 | Place on average polish dries shaved part. |
 | Drill a hole through a rubber ball in the thigh.
This is seen from the front.
The length of the groove until it is made a little more than half.
Will be drilling holes only move in short rubber minute. |
 | Seen from above. |
| Opening the hole will be as shown in the figure. |
 | The hip joint ball through the wire also.
So that the wire passes through the center of the sphere.
|
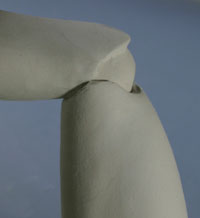
How to make the doll to create a knee joint 12-
 | Cut the back of the knee joint to put the ball.
Seen from the diagonal. |
 | Seen from behind.
Cut along this line. |
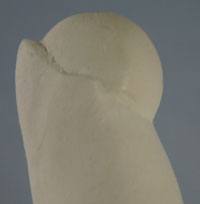
 | There are no flat and failed to cut with a sword from a sword sharpened triangular line. |
 | After the cut, you cut the inside until the last minute.
Is so thin and fragile. Handle with care. |
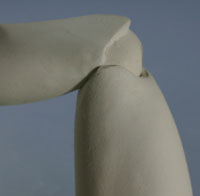
 | Knee joint is ball and write on both sides of the center point. |
 | Let's put the ball of the knee joint.
Enter until the ball so that the center point.
You can further cut or cut inside, it was a deep cut behind the knee If you do not turn on.
When the ball does not seem to fit scratch it to the limit, put a little sharpened on both sides of the ball. |
 | Cut back or knee, so after this, you have lined with clay. |
 | The wet clay stuck to the inside of the knee with water, and the wheel. |
 | Push the ball knee joint.
Be careful not to block the hole drilled out the Styrofoam ball joint at the time. |
 | Fill with a clay ball in the gap before and up to the knee. |
 | Also checks the same height in the ball of both knees.
If it is not even shifted in accordance with the drawings. |
 | Arrange the shape of the knee.
You cut the shaded part. |
 | The front of the knee also cut further. |
 | Unnatural place is packed the clay smoothed sharpened. |
 | When viewed from the side like this ... |
 | Once dry, clean and polished. |
 | Cut the back of the knee is also part of the thigh.
This is seen from the side. |
 | Seen from behind. |
 | You can cut it with his sword with his sword sharpened triangular flat from the line. |
 | You cut to fit inside the ball. |
 | After verifying that the knee joint ball fits properly,
make a ball and received at the junction of the knee joint of the parts of the thigh.
The clay that stuck to the wheel. |
 | You push the knee joint across the lap. |
 | Clay overflowing cut, clean and polished when dry. |
 | Drill a hole through the rubber.
This is seen from the above. |
 | Seen from behind. |
| Opening the hole is shown in the diagram. |
 | Thread the wire in the center ball joint to the knee.
Wire is to pass through the center of the ball properly. |
 | Will continue to adjust the angle of knee bend look stuck parts.
I lack a little bend angle of the photograph in the state will. |
 | Shaving the back of the thigh and back knee, and then adjusted until the angle of your choice.
Would you like to double joints bend considerably If you are going, you should knee the ball into an ellipse.
In the sphere there is a limit to the angle bend. |
 | If you turn up much better and I think 90 °.
Bend both knees so that the same angle.
|
How to make the doll to create a 12-joint elbow and shoulder
 | I feel this will create in the elbow joint is visible in front of you.
Although it is confusing and elbow angle to pursue, is the easiest to turn to the front direction. |
 | Seen from the front of the left arm.
Draw a line to take the vertices of the marker was divided into four arms, the inner line. |
 | Cut along the line, cut the inside until it enters the sphere. |
 | Adjust the height of the ball according to the drawing. |
 | To secure the ball of clay. The sphere is to make a little lean on the inside. |
 | You have also made the elbow. |
 | Make sure that the ball was to have the same height on both sides. |
 | You have beautifully polished when dry. |
 | Will put the ball before making the shoulder joint of the elbow received.
You cut the shoulder until the ball to fit the drawing. |
 | And secure it with the clay.
The careful not blocked in a hole drilled into the sphere were placed shoulder joint. |
 | Cut the extra part convex, and prepares the form of a recess filled with clay. |
 | Then create a receiving of the elbow joint.
You can cut in line like the photograph. |
 | Seen from the inside. |
 | There are no fail when you cut from the cut along the line in the triangular sword. |
 | The cut on the inside until it enters the sphere. |
 | Make sure that the ball enters in accordance with the drawings. |
 | Place the clay was in a circle, and push the elbow across the lap. |
 | Now something like this.
To turn over 90 °, a little to make adjustments or cut the inside of the elbow. |
 | You have cut back a little shaping of the receiving hole when the elbow is also dry. |
 | Make a receiving of the shoulder joint.
It was a little too wide in both armpits, and cut from the backing. |
 | Was shaved. |
 | Both armpits are now slightly narrower. |
 | Cut a hole until the ball of the shoulder joint,
put the clay was in a circle, and push the shoulder joint across the lap. |
 | Leave reshape polish dries cleanly. |
 | Drill a hole through the rubber to the elbow joint.
This is seen from the above. |
 | Seen from the front. |
 | Drill a hole through the rubber to the shoulder.
Oval hole is slightly better. |
 | The consciousness that the rubber through the wind like this. |
| Opening the hole through the rubber is shown in the diagram. |
 | Thread the wire into the elbow joint. |
 | Thread the wire in the center of the sphere to the shoulder joint. |
 | Tool used to make the joint looks like this. Router (when not using the cutter and fog), chisel variety, Kang S commercially available, or ♯ 16 wire of needle nose pliersand, of sanding sponge medium and the fine is.
|
How to make ball-jointed doll
provisional adjustment for 13-connected and self-reliance
 | Prepare the rubber for connecting the doll.
Since this is a doll of about 60 centimeters, prepare the rubber of the main enclosure 4.
Shows whether the rubber is what this fine bundles in what it called the main enclosure.
This rubber is sold to ordinary rubber corner of Yuzawaya. Rubber is in a state where two fold, to the wrist of the other side, through the shoulder from the wrist to the ankle will be passing on the opposite side from the ankle through the head later. When it absolutely intolerable to the length of the right, you have cut a little shorter as shown in the photograph.
|
 | To pass through the rubber, was bending the tip of the wire (about 30 cm),
was then prepared to ring the gut.
I stopped with cellophane tape was made to fold the gut. |
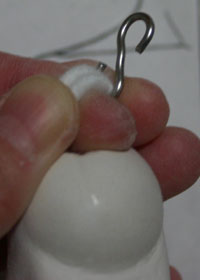
 | S can also make use hook to the head. |
 | Way through the rubber will look like this.
Pass through the wire or in a ball joint, the front
Please be careful or look through the back. |
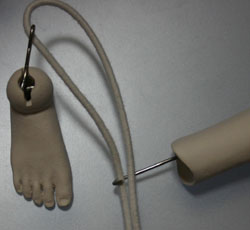
 | You cut through the rubber for the first leg of the right foot to S Kang.
You to come in the middle is in a state where S can fold the rubber.
The way through from the same easy to do so, even from his left foot from any right. |
 | You through the hole of the knee was bending the tip of the wire.
At this time, the wire through the front side of the knee joint. |
 | Hook the rubber feet. |
 | The pull through as it is. |
 | Thread the wire was also bent the tip of the hole in the femur.
This time through the back of the wire was passed through a hip joint ball. |
 | The hook through the rubber in the same way. |
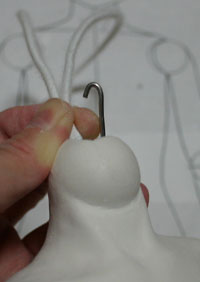
 | You through those bending the tip of the wire through the hole in the neck.
This time behind the wire through the side of the ball joint neck. |
 | You pull up the rubber. |
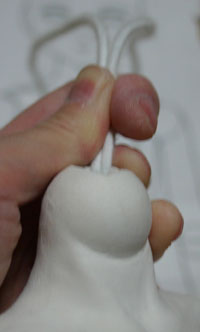 | Pull the rubber in place of some strength.
Joint will be too weak to pull Gutaguta.
Joint will cause too strong but also damaged. |
 | Out of the hole in the neck through the tip of the wire was bent through the hole in the femur.
Behind the wire passes through the neck of the ball joint at this time also. |
 | You pull through the rubber. |
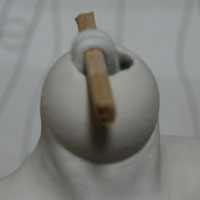 | Neck Bow (The photo was cut disposable chopsticks) place in the hook anyway. |
 | Rubber thigh and knee parts through, the last is the ankle in the same way as when it came.
Pull the rubber in place of some strength. |
 | S can hook the leg, ties the rubber. |
 | Knot is hidden in the foot. |
 | At this point, this state is entered. You may also adjust the independence here. Adjustment for self-reliance are described at the bottom.
|
 | Then thread the hand. |
 | You go through the rubber in the same way as the feet.
Behind the wire passes through the sphere of the knee joint. |
 | Turn the wheel was in the gut through the hole in the shoulder joint.
You to pass the ball on top of the wire was passed through the shoulder joint. |
 | Hook the wheel from the tip of the wire is bent, pull it out to the bottom. |
 | Hook the rubber wheel of the gut. |
 | You pull the gut through the rubber. |
 | The hole through the shoulder to the opposite side.
There are rubber feet in the fuselage, but also through the back through that before
There is not much difference. When in doubt, leave through the back. |
 | Shoulder on the opposite side, put the gut was found in a circle from the elbow. |
 | And pull it out of the ring through the hole in the shoulder joint. |
 | Through the rubber to the gut, you pull the rubber up to the elbow. |
 | Also through the rubber elbow in the same way as when it came, Tie at the wrist. |
 | (Careful not to let the rubber at this time), the S Hook for the head can take the stick of the neck. |
 | Hook the loop of wire in the part of the head pipe (S).
If you do not reach to ensure the length by pulling the rubber,
so you can hook hanging S. |
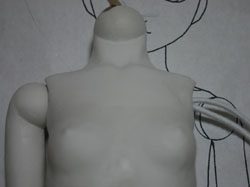
 | You stuck your head. |
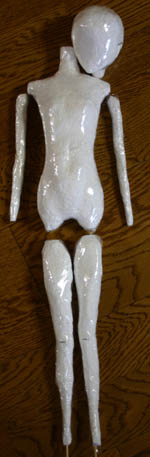
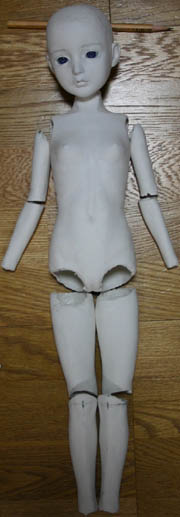
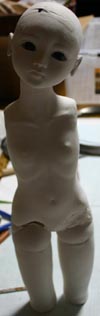
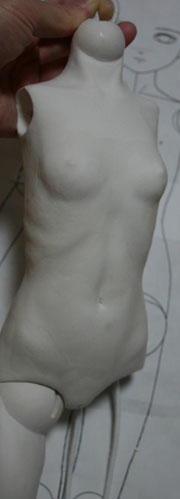
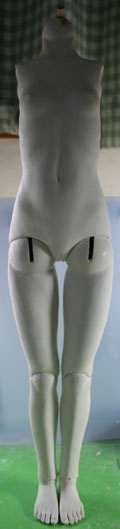
 | Was assembled. So as to make drawings, it should be as large as planned.
As we have created is smaller limbs like Super Dollfie body type. Please do not worry too much about dolls, but the photo is not connected to the wrist and arm.
|
 | Back is turned like this. |
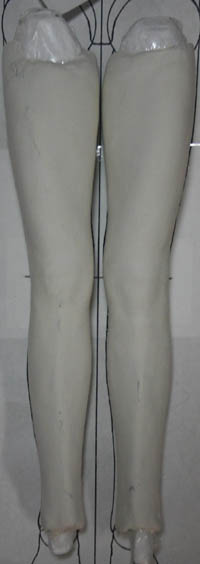
 | The doll is well-balanced, you can be independent even without a stand. Independence is not difficult never. In order to confirm that the independence properly, the body of the doll has hand-sitting face to face with the doll. To secure it to the floor and then stepped on the foot the toe of the doll. That way is easy to do but bad behaved. While fixing the toe, and sat down to adjust the angle and the knee joint of the fuselage, you can see clearly is self-sustaining balance. Dolls are perfectly independent, do not down too much shaking a little, and return to the balanced position yourself. Dangerous is when, it will fall as soon as the swing even if you self-reliance. When not in self-reliance are considered to be the first sitting of the knee joint is bad. Since independence if absolutely made the right knee joint in accordance with the drawing, please try to make sure. After independence and does not does not match the drawing position of the hip joint. (You want to be a strange attitude even when standing)
|
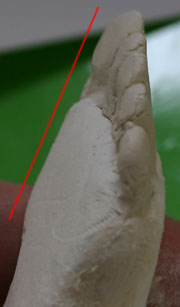
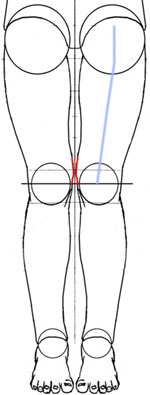 | In addition, it is not so good when O becomes independent leg.
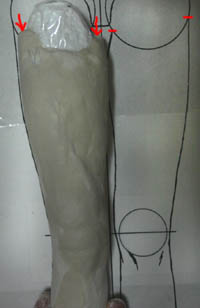
Let adjusted so that the knee is closed as a blueprint. O can be eliminated if the leg adjustment of cut of the knee joint, the height of the left and right. It is often a little longer to heal and cut the inside of the knee is not say unconditionally. (Red line portion of the figure ←) if it is only hard to fix this, cut to shorten the outer knee joint. O feet, in order to attempt to create an upright position with respect to the ground the thigh phenomenon happens I think. I think I may be aware that it is as light blue line diagonally. (It is perpendicular to the ground below the knee)
|
 | Bend the knee or sit down, you have to see how it works. |
 | Make sure the image is covered, such as looking wig. |
 | Understand the rough and take a picture at this stage, where you will see should be corrected.
Let's take in the various plan was completed. |
Adjustment for self-reliance
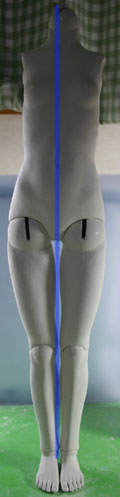 | I think some people do not care about self-reliance and less.
Independence is to say that you match the length of the foot properly on the left and right, but
(that attitude of the sphere is the same on the left and right hip joint that is) the same thing, in the thickness of the received left and right hip
of such maturity There is also a measure of height.
Let's independence because it will make much trouble. Adjusted so that from here described was carried out before all provisional assembly, during assembly on the photo will be something done after adjustment. Let stand while assembling only legs and torso. Do you see the whole body, and it is tilted toward the right side. It has been made in accordance with the drawing, you have a subtle shift occurs because the rule of thumb in this way after all.
|
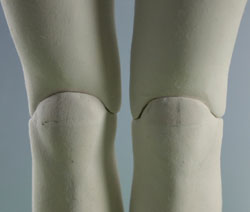 | A look at the knee, is not enough as the height of the right knee toward. |
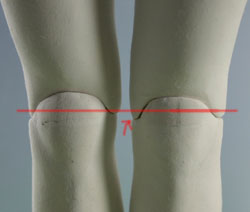 | Do you see the left and right ... The difference in height |
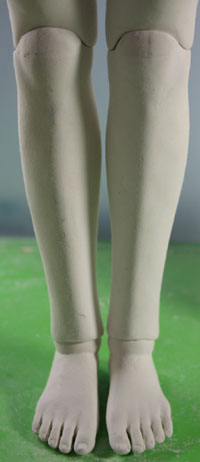 | Looking a little floating right leg towards seems to fit the height of the knee.
In this case, we received a little more thick of ankle, raise the height of the knee. |
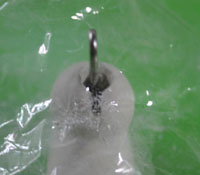 | Since S has come out cans and thread the pipe (S) opened a small hole in the wrap. |
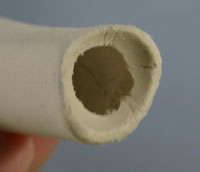 | Place the clay in the same way as when received made the joints of the foot, and push the foot.
Because the goal is to thicken the subject, avoid pressing too much. |
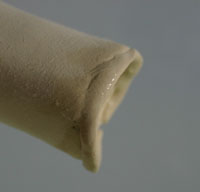 | Minutes were received thick, the outside of the ankle has become shorter.
You have have a long clay. |
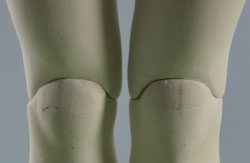 | Was to adjust the height of the knee is now the same as the left and right. |
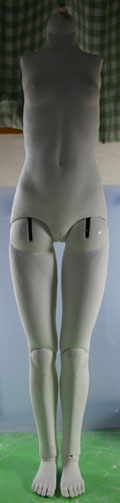 | I think I do okay with this, check detailed further here.
It is easy to understand and take the photo, is often unaware about this fact in front of you. |
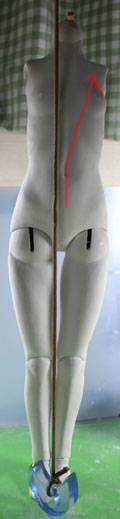 | Hanging on a rope from wearing the weight, make sure that the body is upright.
What It can be seen that only the body tilted to the right side.
In this case, you can adjust the thick of the thigh on the right side toward the subject. |
 | The adjustment, now stand properly. Incidentally, this string and weight are curtains that had stopped behind Ballmer into (- ;)
|
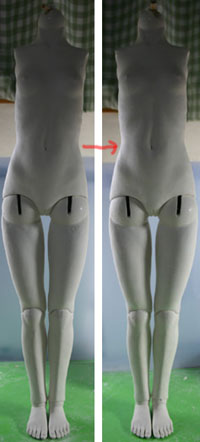 | So much has changed before and after adjusting for adjustment.
|
How to make the doll
14-Shine
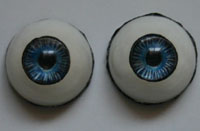 | Prepare a favorite use in the eye of the doll in front of the Shine. This is handmade eyeball. |
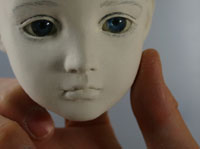 | With the clay on the back of the eye through the hole in the neck, and stuck the eyeball.
If the glass eye and put a lump of clay on the fingers, stuck a glass eye on it,
in the hall as it is fitted to the eye, and then to come down to the clay around the glass eye
and secure it. Absolutely, but who can not be easily done is look into the eyeball within the head are divided
so please put fixed. Or because you then painting or sanding,
the surface of the eyeball must be affixed masking tape and masking sol.
It becomes very process of masking around the eyes and has been,
put at the end my eyes is recommended. |
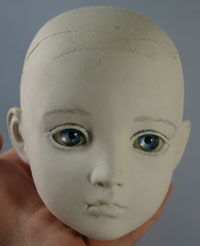 |
The depth of the position of the iris and the eye itself is determined, the dry clay that hold the eye.
Once dry eye is disconnect it.
Foundation of the eyeball was hooked, you will guide When you put the eyeball before finishing later. |
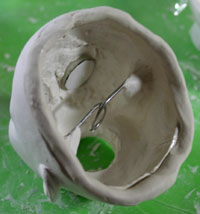 | The following connect the head had been divided.
You have to have a portion of the boundary clay. |
 | Align the head, pushing you stuck.
The beautifully arranged so as not to leave from the outside seams. |
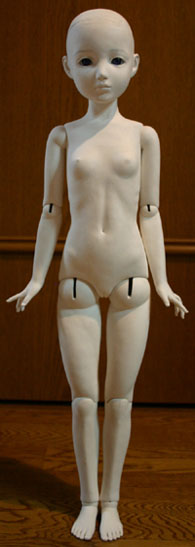 | Please select your details If you have a stuffed up here. Look at the doll was assembled, look for the coarse. Once inside the paint can not fix, as long as you pay attention to detail possible. I think you can, even in good taste become asymmetrical, such as face, put it asymmetrical when viewed from the time when it comes to very concerned about. I do not mind because when you are making that familiar. In the same way, but from the perspective of asymmetric others are not familiar will know immediately.
|
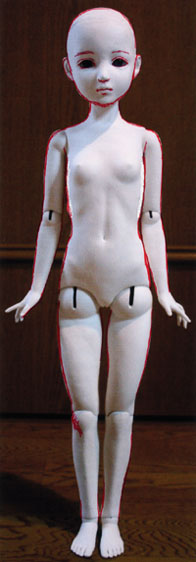 | By just looking at the real thing is so crude that can not be looking for, you can print a photo of when he teamed up
with a pen have put the fix red. When you turn on the left is a thing of actually fixing the picture above. O has become subtly leg at this time because I did not feel right knee joint. Fixed by adding the clay to fit the blueprint.
|
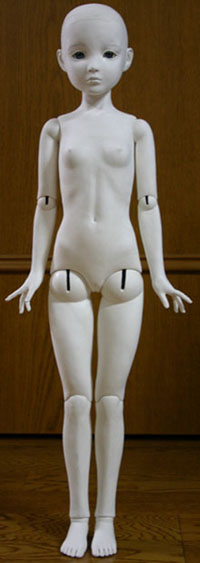 | Was modified as shown in the figure will be fixed. Where I have to worry about in filling details are missing or where the recessed strange on the surface, the symmetry of the parts the depth of the groove and rubber, the symmetry of the hole symmetry of the (exterior) received a joint -symmetry of the attitude of the sphere (such as femur or go up the same angle) symmetry of the curvature of the joint length of the left and right-hand finger, foot, the symmetry of the width at the base of the ball joint, ball there are no rough or when stuck to , etc..
|
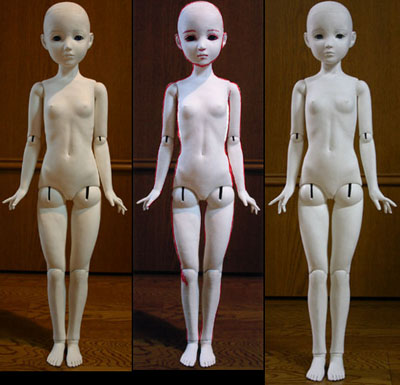 | Three stage change.
It had been shorter than knee blueprint before I knew that
was a little stretched.
Was slightly larger, had small hands later. I have changed anything! ? But there may also feel What detail is stuffed ... even if they are not important at first glance changed as can afford to be seen up close the real thing, you make sure to fix the rough as much as possible in a state of naked .
|
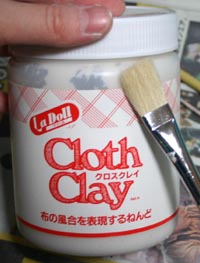 | Next, in order to clean the surface of the part cross-clay that you apply. Paint brush to use when much is leaning against a certain size. Prepare a thank you from the big brush is cheap. that you apply. Paint brush to use when much is leaning against a certain size. Prepare a thank you from the big brush is cheap.
|
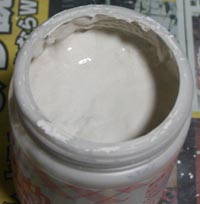 | Clay Cross is the contents of the.
Clay Cross may seem to be dissolved in water Mirador,
I think it is better because the alternative is not actually something completely different. Clay Cross is like a mud If I compare. Modeling is not the power to fine, you helped me fill the small dent.
|
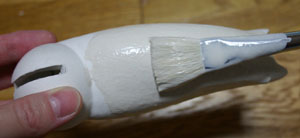 | Clay Cross for another vessel, and about 40% bond mix is used. We will paint the remainder of the sphere with a ball joint.
|
 | Hook the wire to wire in such a form ∫ parts.
With the wire, apply a portion of the ball at the end. Be surprised, but I think because it rash, fine so all can erase later.
|
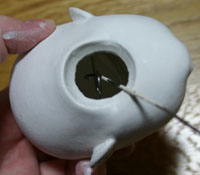 | Parts of the head, you can hook to place the S-hook in the head, the tip of the wire was bent.
Clay Cross painted on the face or head as it is, you fill the place of receiving the neck at the end. |
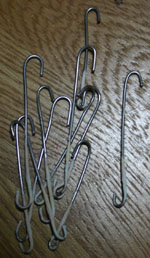 | ∫ wire of this form.
Or is this a good idea what to make. |
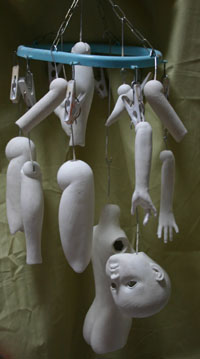 | All hanging to dry. |
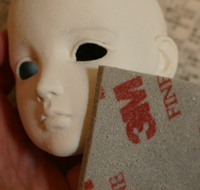 | Once dry, the sponge sanding fine to turn off the polish with rash.
Then super fine polish with. polish with.
To clean and polish each grain on the surface so as not to leave. To polish the back of the ears and between the fingers and toes will use the file # 400 of cloth. Fine and polished as far as convenient to use fold.
|
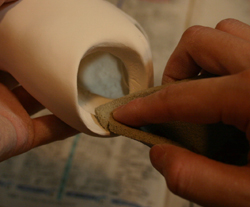 | After all polished, to receive all of the work to make you relaxed.
Out when the thickness of the base coat after this, joint, because this will no longer turn on.
This is the work do not have to be sure. I hate most is ... But in fact
|
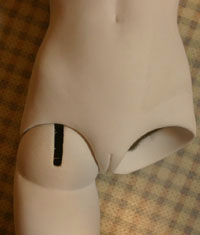 | I made clear to receive the thigh.
You have to make it work with a margin. |
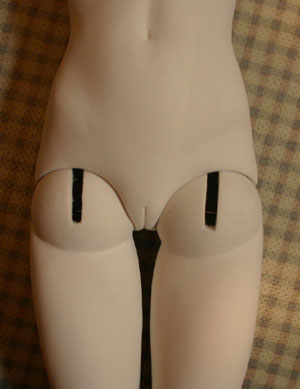 | After the cut toward the left and
right, shave before heading the ball on entering it different ... Do you see make a clear feeling about this. But I think where the trouble is how much is actually this clear, I have thought about drawing paper or I will enter two pieces. If a nullーDo a little more thick oil paint is required. Coating thickness can be adjusted by the base when too much margin, may be better placed to make the lot. Please also consider the thickness of the cloth to stick it later received.
|
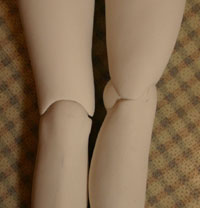 | Clear of knee adjustment will chose my mind.
If you've become if not match, the impact is because large.
(Other joints but it's okay sticking out about a little ball,
will not bend the knees and terrible I can not independence knee and not tight-fitting joints) the difficulties of adjustment of this neighborhood is the reason for hate. . .
|
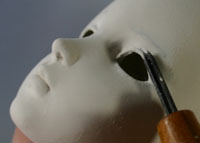 | After all polished, causing fine carved part had buried in Clay Cross.
Nail in the limbs, such as lines and double.
Chisel the smallest guy in the photo is of a triangular sword. About 2 mm on a side of the cutting edge. |
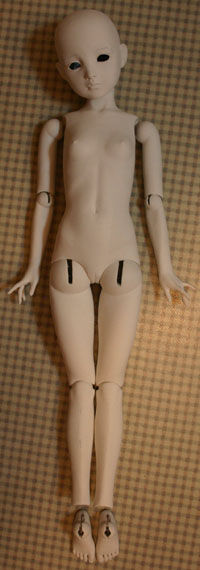 | Surface is now smooth.
This tool with sanding sponge fine and super fine No. 400, of sand cloth, carving knife is. Sanding sponge is should have bought one at a time, keeping enough to make dolls on earth. It very useful and sturdy, because the powder Suitore revival soon as a vacuum cleaner. Polished surfaces also cheaper, than bother with numbers, such as use of sandpaper, sanding sponge set ( Medium , Fine , Super Fine ) the better I think I bought.
|
How to make doll -15 base coat
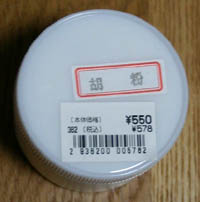 | This time the groundwork beaten chalk use.
Chalk is sold to Yuzawaya time. When it is not me and I think if you put the order. When not found You can also create a modeling paste. In that case modeling paste 6: Create the agent in the water qs 1 + gesso base. Do not include a bond.
|
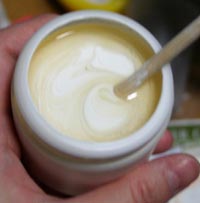 | Has opened in this way. |
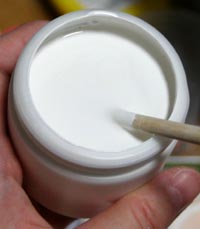 | Mix well.
(There are also freshly chalk stock has not been isolated, you can use to mix well in that case) |
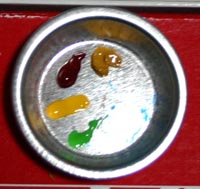 | It is so in a way to finish with a skin on the substrate as it is.
I use color to taste Holbein transparent watercolors.
Strange colors or even tried putting green or you try to make the skin tone.
And put a little blue instead of green, calm adult will be the color moist. At this time, the white Please do not put in the absolute.
|
 | The mix will look like on the formulation. |
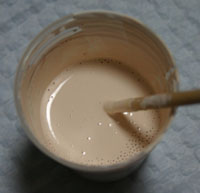 | The chalk 50cc transferred to another container, stir well and adjust the color of transparent watercolor.
Because they have only floating color and do not mix well, and mix well. Try to fill, such as newspapers try to make sure the color of the skin has become perfectly. Rather than a mix of white paint when too dark, and diluted with chalk. Will no longer function as the base is low percentage of white chalk and would mix.
|
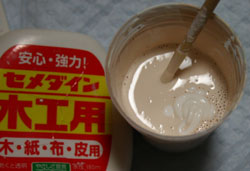 | Skin was able to chalk 15cc of water added to the diluted.
Since this is a value measured at the time tried to make this time,
may change depending on the season. (When recording in summer)
much depth of character is not transparent look under painted a newspaper, even if it is dry as good.
Please skip the moisture when left to stand for a while too thin. Once you have adjusted, turn on the bond of about 20% of the total amount. Put a bond, and mix well. If you can, you have removed a chunk of the bond or the like tea strainer strainer. This has become a total of about 70cc in 15cc of water to make about 5cc + Wed 50cc + chalk color. This will be the amount of if just to make (about 60cm) of SD size doll.
|
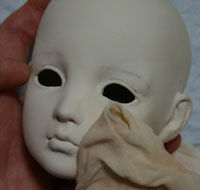 | Parts of polish residue fine, leave it and clean it off with, such as bleached squeezed tightly. |
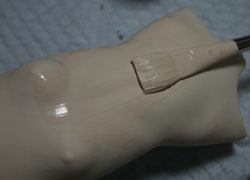 | We will paint with a brush and swish swish of width.
Painted in the same way as when Clay Cross ... |
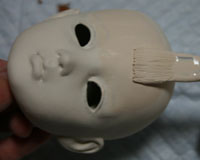 | Changes the size of the brush by parts. Details such as where will collapse is likely to face is painted on sparingly.
|
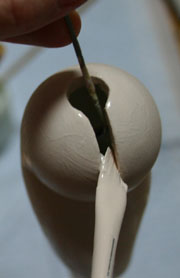 | You also painted the inside of the groove of the joint. |
 | To all parts of six coats to.
Dry paint is dry paint ... but then,
I think there is little waiting time because the first parts are dry during the cycle through the parts. Because the way I think, come and be pulled out of the chalk water of the container, plus the moisture while you work.
|
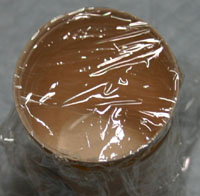 | The rest was just a little chalk.
They may be bald when the Ru substrate is polished later,
taking place over the rap for its repair. |
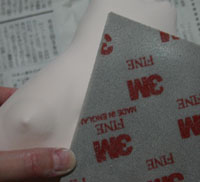 | Are not from here has been slow.
If it gets dry enough not to stick to the hand to touch that part of chalk,
a sponge sanding Fine , Super Fine erase the handwriting in (for details). |
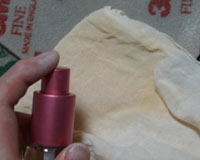 | Moistened with a spray, such as bleached ... |
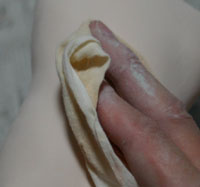 | Erase all traces of a file in polish its bleached. More superimposed painted in frosted polish is reduced to ensure this. The same also as polishing, re-painted with chalk When I peeled off base if you have taken. I would polish is completely dry and chalk will be really hard. I think 12 hours is better polished.
|
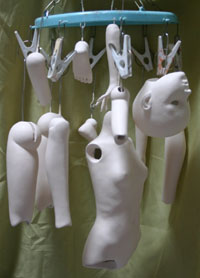 | Once the details, such as nails and is closed eyelids filled,
place in the wake carving chisel. I could skin the color of the base of this. Leave about one day this hanger to keep hanging, and dry completely. Even when using pastel, oil paint, acrylic tinted to the last base is common to all. Chalk paint work that is time-coherent. It is better they do it at once such as the day of rest.
|
How to make ball-jointed doll
coloring and make-up 16.
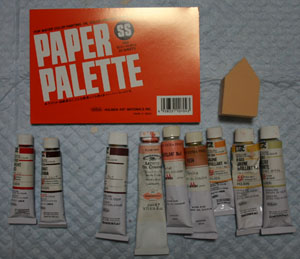 | We will go in the oil finish.
Oil finish, so you have to be familiar with the subtle,
you want to finish quickly the first time! What is towardpastel make-up is recommended. (Because there is no small thing always only partially), paper palette for makeup sponge , various oil paint, pen Chin operating oil, (such as the eyebrow brush and draw a flat brush and scoop the oil mix paint brush fine point brushes Prepare a) . Cosmetic sponge is the one that usually sold in Matsukiyo. I am using is fresh paint, ivory white, shell pink, mainly burnt sienna, etc.. (Flesh color, color protein, pale pink, brown) because of the different colors subtly also the name of the same color by the company, ... has been buying in the company of different colors of your choice by oil When there is an object Ru Teka even after drying so care must be taken. When oil is dry most dangerous things Ru Teka speed.
|
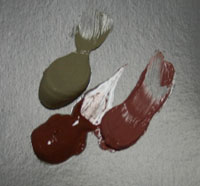 | Issues appropriately fresh and white ivory and pink shell. |
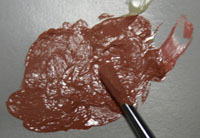 | Mix.
This will be the color of reddish base. (I say this is the basic red and below) (Can I just use it to buy a coral red color)
|
 | Place a strong taste, such as red lips are making a mixture of brown and the flesh. |
 | Is a description of the basic use of red skin here.
Rose Gray left, the right is made fresh on the red of the principal.
Bluish red left, right is yellowish-red.
Meaning is unknown to a red or blue, red is that red and orange pro-pro-purple.
Those two will be finished Fun'iki, even in the same red is totally different.
The image of the fair is like sheer, Rose Gray (Snow White, or ... If I compare vampire)
in healthy human skin color or fresh Oriental is appropriate.
In addition, Rose Gray, if the system blue dress clothes will
look good and you must use a fresh energy system, such as yellow and orange colors.
Desu Tsukaiwake taste of red is useful to know.
I think that may have been aware of it from the stage of chalk paint. |
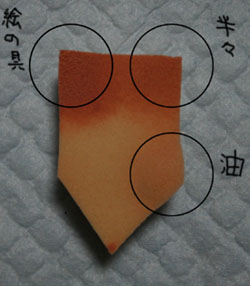 | I am a makeup sponge for now is how to use this.
The photo should be of ... several times after using the far left corner is where the direct use with a red base. Will use the lower-right corner of moistened with oil with a brush pen switching. Right corner are marked with paint and oil in half. Create a subtle gradations whichever corner of the three.
|
 | First, you fill the oil to where you want out of the redness in the corner wearing the oil. |
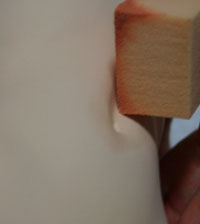 | Wipe lightly with oil in different parts of the half. |
 | You rub the color in the corner marked with paint. |
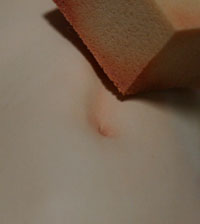 | You can adjust the color at the corners of half and half. We will put the color in the whole like this.
|
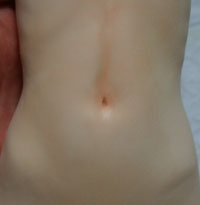 | Rubbed the red of the will in part become a basic part shade, have a dent. |
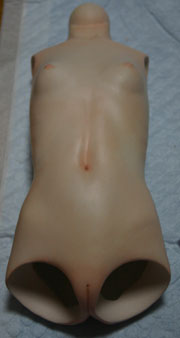 | I think I will put the redness and it seems also the junction of the joint. |
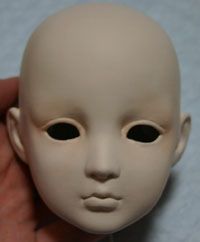 | Face, put a shadow around the eyes first. |
 | Then draw the eyebrows.
The color is a good fit to the hair. |
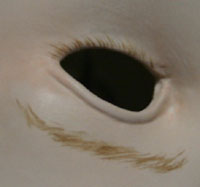 | Also draw eyelashes.
Be easy to draw who is drawn upside down.
I think I will vividly pink and thin paint to the edges of the eye after. |
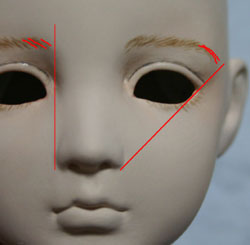 | The position of the eyebrows,
eyebrows will start from where it stretched out a line from the edge of the wings of the nose.
Edge of the eyebrow is a good balance is get inside the shaded corner of the eye connecting the wings of the nose and. It is common sense of the makeup of a woman I (probably), I think that may be about dolls because the doll reference.
|
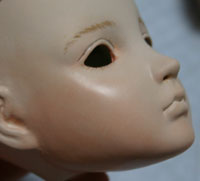 | The base also painted red cheeks.
Gradient in the manner ... with a sponge attached
to the cute toddler cheeks turn red and the bottom up.
I think you can do is cute red puppet so pretty. |
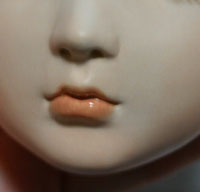 | You also painted lips.
At first I tend to thin upper lip,
I think I'll draw cute and Poku Mt.
I think that seems to be Pote~tsu doll lips and some on steep slopes about Mount Fuji.
Sexually attractive to the lips and to plump the foot of Mt Fuji. |
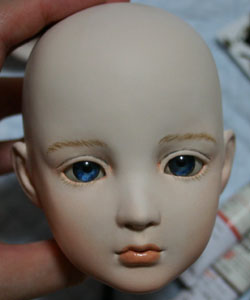 | Make sure the image look into your eyes. If you stick the eyelashes, who put before turning on the eyeball is easy to do. I may be a commercially available eyelashes, you can also make the eyelashes from the brush. Recommended soft, natural finish so. To the completion of the last photo is growing eyelashes. How to Make Dollybird Vol.9 has free and easy resources to help you make law of Mr. Araki Gentaro.
 |
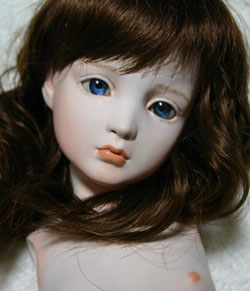 | If you buy such as mail order hair, eyebrows ... Draw always come from
or have different colors and will be expected to draw.
(Are you doing about twice already that) point ☆ important information about the color of the eyebrow ☆ eyebrows, next to the neck and the side of the face when you put the hair to the color of the hair "shadowy" Align. Will become thin and feel to match the color of hair visible in the bright place. ♪ When in doubt, please try it if you put no doubt to suit the color of the shade I was a little brighter this time eyebrows so thin a little more color to the hair later. Special as the color of the eyebrows, in black or gray hair ... What I found a thin black shine, but will want to be a mood to light gray. You could be tempted when mixed with white to make the color of the eyebrows, feel good because Nigora white color is better if you can not mix. Eyebrows are major parts of the face! I want to draw got to buckle down.
|
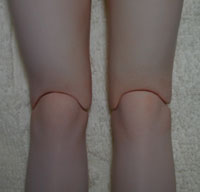 | The red in the red base coat is also the junction of the other joints. |
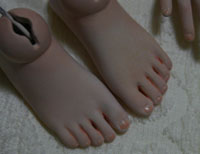 | Also put on your favorite color nail in the limbs. |
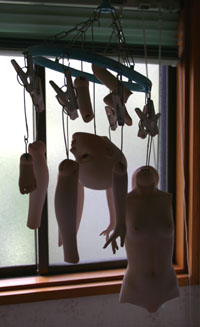 | It takes about a week is about oil paint to dry.
Keep hanging to dry.
Like most early dry well-ventilated place. Note the dust! |
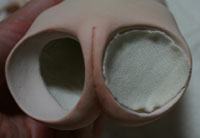 | Once dry, stick the cloth in the receiving part of all joints.
Cloth is fine, such as worn-out underwear.
Smooth movement of the joint will be pasted cloth, dolls might be difficult to damage. Cut the cloth to the size of the received first ...
|
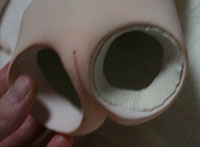 | Cut out the middle folded in two, and then paste in the bond. Be careful not visible from the table cloth.
|
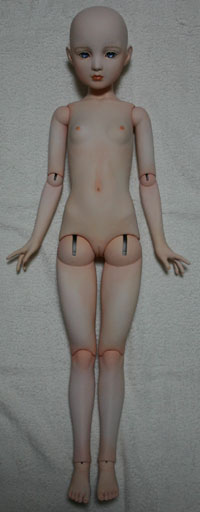 | When you are finished, the completed assembly in the same way as when temporarily assembled. If you have painted in oil paint, you may remain black when you touch the metal traces. Ring of silver, watches, etc. Try to avoid close to the doll.
|
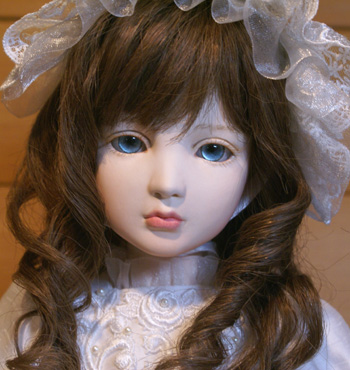 | Is now complete and cover a wig doll wig Since this is a doll! Doll making is not tired of doing many times, you think it is because there is fun in the process of what ingenuity. ♪ I please try to make the doll means only one in the world
|
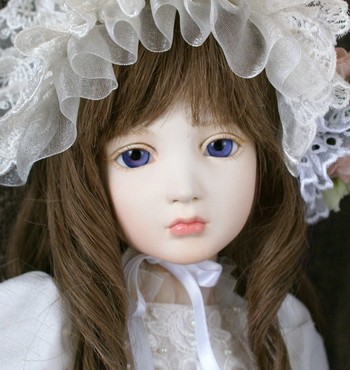 | Extra
glass eye ver. |
How to make doll
hair paste, 17
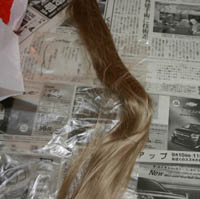 | Prepare a commercially available doll hair.
Doll hair is or what had become (slightly twisted silk thread used in Japanese doll) suga yarn,
there is a vegetable fiber such as rayon, of animal products. (Or use dyed with tea)
thing on the market ... is higher still, but option is to use human hair later
in the texture and gloss is for sale enemy does not have a human hair,
well with doll hair on the market if not stick so much is. |
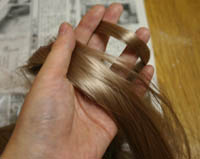 | Doll Hair is included in bundles.
Carefully cut the yarn bundle, you should keep the state of the bundle.
, A bunch Wakedori small amount, on the one hand the hair from the central portion of the doll hair
with one hand and the other how to split with firmly and pull it away.
To be a mess if it is not done in this manner. |
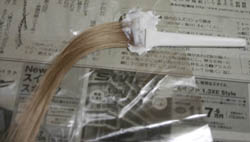 | Cut to any length, it rests on a plastic bag or plastic wrap that paved.
With a bond to the edge, spread flat with a spatula secondary residence.
To avoid a bunch of thick hair!
Or have only roses, while the bond is not entered until a thick bundle and
then or can I have a strange bulge in the head after a start. |
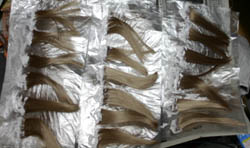 | Make full and dry the same thing. |
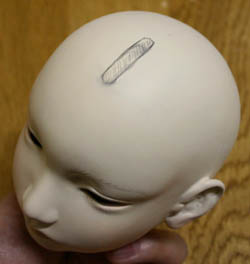 | Where to draw the dividing line to make the doll's head. |
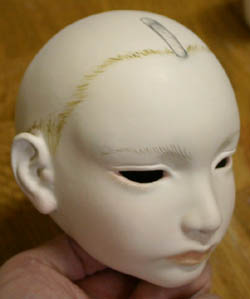 | Draw the hairline. |
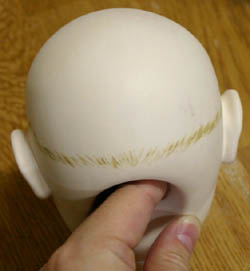 | Also draws back. |
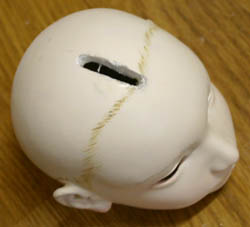 | The carving in parting chisel part painted earlier.
I think that it is easy to do and Ru drilling flat muzzles with a sword with a sword roughly carved from the corner.
Hole part of the dividing line should be left wide open.
Human hair is stuck to fail with so many holes in the part that is less about parting,
here is the important point. |
 | Provide a stable platform and plastic bottles.
In my case ... green tea boxes and polish
it, you may use water into empty plastic bottles. |
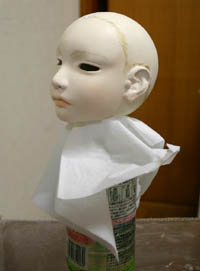 | Place the doll's head.
Across the tissue so you do not have neck and scratched in the bottle. |
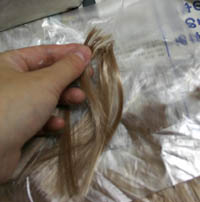 | Takes the doll hair solidified with bond.
Bond has protruding strips with scissors, and trimmed the edges. |
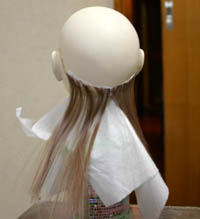 | We will stick from the bottom up. |
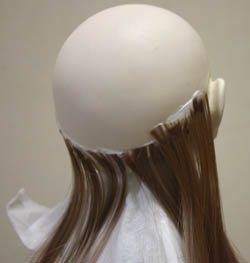 | So many odd amount of hair and much too close together,
we will gradually put in a good distance while looking at the situation ... |
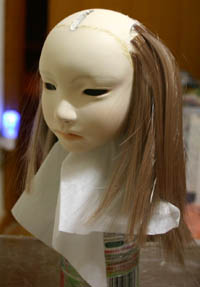 | Was a little too close together ... we will put Jonjon while watching the situation.
|
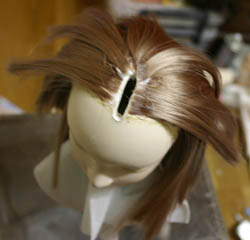 | Was pasted up around the parting. |
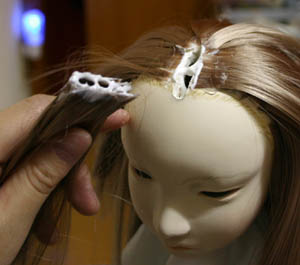 | Prepare a doll hair with a thickness of the thickness of the hole minutes.
Who had been prepared by the length of the hair longer than normal is good.
Into the hole with a bond.
State is chock full of doll hair in the hole is ideal.
Bond and scalp will cause visible when parting with it lean, creating a much. |
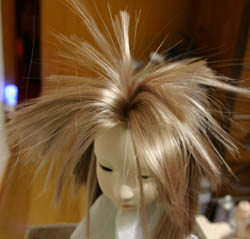 | Have exploded violently. |
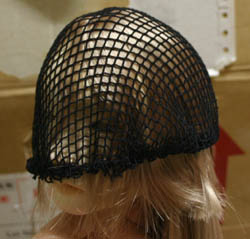 | Have prepared a parting, to cover the head with a net stop for people Bun.
Bun nets can be used unexpectedly. |
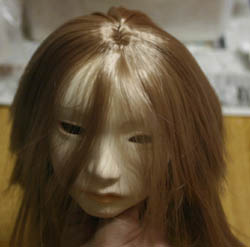 | Was calm. |
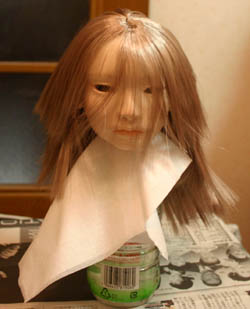 | The following is a cut! |
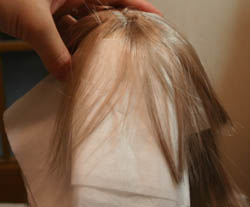 | Let's cut with a tissue covering the face and scratched so win a pair of scissors.
Good luck Please also be cut course does not ... |
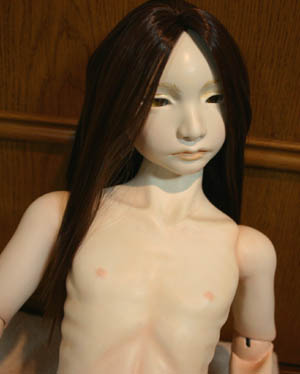 | Having failed to cut Sure enough, the form is completed and turned brown hair. The amount of hair you use will depend on the length of the hair it also depending on the doll. Measure the length and draw a line that put a hair on the head, inserted into the head of minutes it is good if there is a minute in length plus a bunch of hair. The amount of hair is inserted into the last minute if the width of a root "Mino" is to stop sewing. Please do not ask so they ask me in trouble even if the amount of your doll's hair (sweat)
|
(DONE)
Original Web( http://www.aimi-doll.com/)


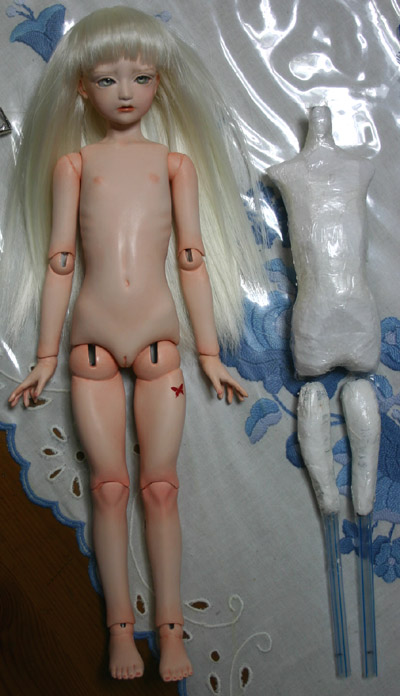
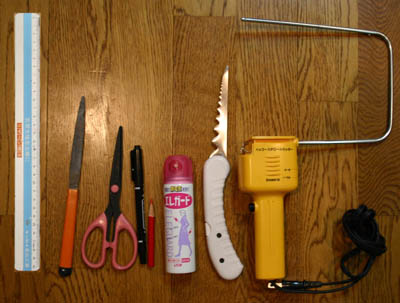
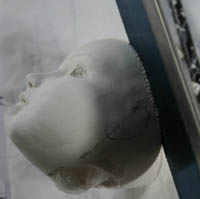
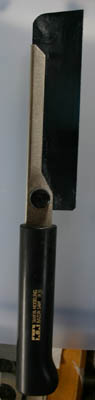
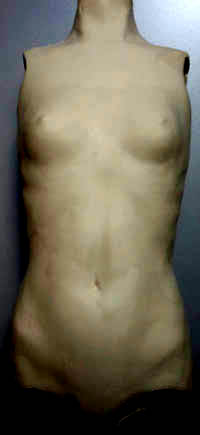
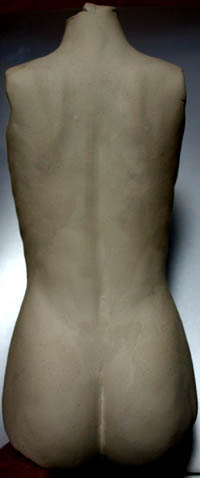

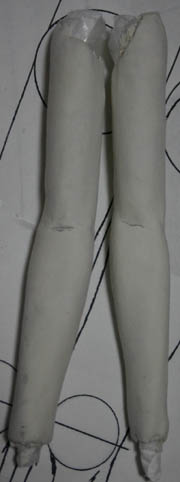
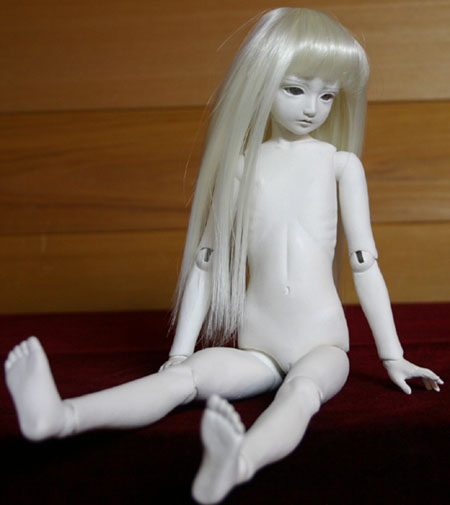
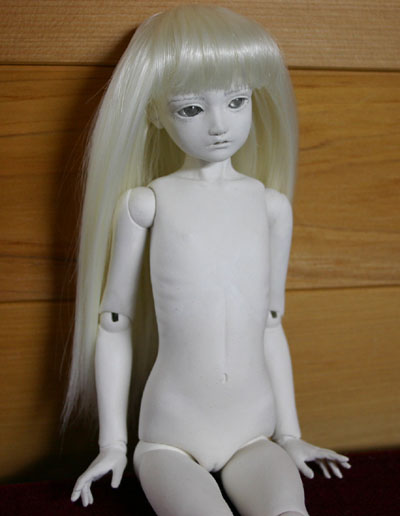
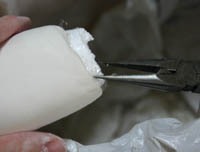

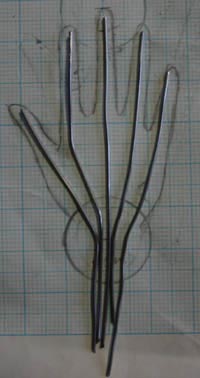
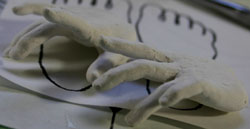

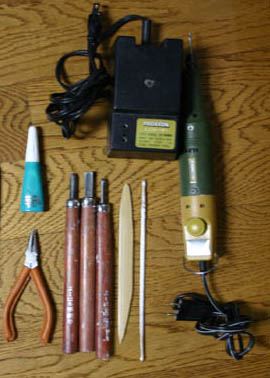
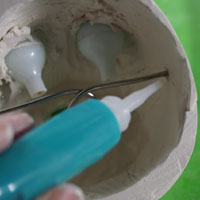
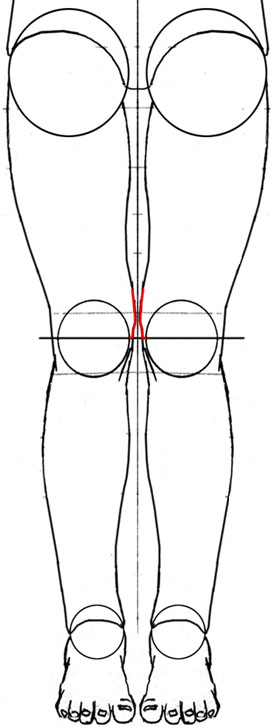
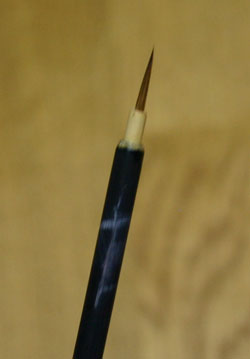